Social Icons

Pages

Showing posts with label russian artists etsy team. Show all posts

Monday, October 6, 2014

Children crochet leg warmers free pattern Molika


The temperature is going down so it's time to get warm! Get your bulky wool yarn and crochet hook and you will make these pretty legwarmers over the weekend so your child's little legs could stay warmer this fall and winter.
https://www.etsy.com/shop/AACottonCreations?ref=shopsection_shophome_leftnav
This free pattern is courtesy of Adina from  А&А Cotton Creations. Check out her matching cowl pattern, too! 

Children crochet leg warmers free pattern Molika
Skill level: easy

FINISHED MEASUREMENTS:
8” x 11” (20 cm x 28cm) unstretched for 1 to 4 years old child
9” x 13” (23 cm x 33 cm) unstretched for 5 years old to pre-teen

MATERIALS:
·Loop&Threads Cozy Wool yarn. Super Bulky, Yardage/Meterage: 90 yds/82 m, ball weight:4.5 oz/127g.

·Lion Brand Wool-Ease Thick & Quick Yarn. Super Bulky, Yardage/ Meterage: 108 yds/98 m, ball weight: 6 oz /170 grams

- or any other blend of similar yardage yarn. You will need 1 skein for toddler size and a little more for children size.

Crochet hook  M/N – 9 mm or size to obtain correct gauge.

Buttons (optional), tape measure.

GAUGE
7 hdc x 6 row = 4” (10 cm) square.
Make sure to check your tension before starting to crochet. The width is more important to get right than the height. You can change hook size to bigger or smaller to get right tension.

ABBREVIATIONS:
This pattern in written in US terminology.
ch – chain,sl st – slip stitch, hdc – half double crochet, sc – single crochet.

NOTES:
The legwarmers are worked in rounds.

CROCHET LEG WARMERS:

For a child 1 to 4 years old:
Start: ch14, join with sl st in first ch to form a ring. (Make sure chain does not get twisted when you join.)Note: Check the circumference of the ring, it should be stretched out to 9”(22cm). If it’s bigger or smaller change the size of hook or crochet by a different size.
Rnd1-15: Ch2, hdc in all sts around, join with sl st to top of beg ch2 = 15 hdc.
Repeat rnd 15 if you want your legwarmers longer.
Fasten off. Finish off loose ends.

For 5 years old to pre-teen:
Start: ch16, join with sl st in first ch to form a ring. (Make sure chain does not get twisted when you join.)Note: Check the circumference of the ring, it should be stretched out to 10”(25cm). If it’s bigger or smaller change the size of hook or crochet by a different size.
Rnd1-18: Ch2, hdc in all sts around, join with sl st to top of beg ch2 = 17 hdc. Repeat rnd 16 if you want your legwarmers longer. Fasten off. Finish off loose ends.
 
Decorate your legwarmers with buttons or crochet flowers if you'd like or leave them as is. They are pretty either way!
 
Happy Crocheting!

Tuesday, February 19, 2013

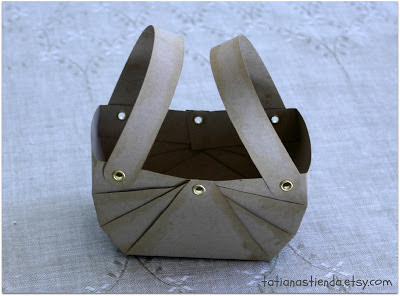
How to make an Easter basket for your spring treats


Spring is near and so is Easter. Get ready for the sweetest spring holiday by decorating your home! We love to decorate with handmade things so today Tatiana from Tatiana's Tienda shop on Etsy will show us how to make a cute little basket for your sweets or goodies.

To make this basket you'll need:

Cardstock or heavy weight paper 11"x 8.5"
Punch and copper eyelets size 5mm
Felt, ribbon,
Scrapbook embellishments: butterflies and flowers
Scissors, glue, ruler, pencil

How-to:

Take a piece of cardstock and divide it into 9 equal squares. Take the middle square and divide it in half. Draw the lines as shown on photo.
Make cuts with the scissors, about 3/4"  from both sides. This is your basket handles.
Divide the squares into three sections and draw the lines. Cut and fold them. 


If you'd like to create an old edges effect use a brewed tea bag:
 Fold strips one by one and then fold the front part. Use a punch to connect the parts together.
Decorate with eyelets.
 Attach the handles to the sides.
 Our basket is almost ready, but we still need to decorate it. 
Tanya used a pretty nylon ribbon and felt to decorate the inside perimeter of her basket. She also glued a felt semi-circle on the front.


Make your basket one of a kind and use your imagination to decorate it as you pleased - have fun!


Tutorial by Tatiana (Tatiana's Tienda)

Tuesday, January 29, 2013

Holiday gift exchange 2012

It became a tradition already to have a Holiday gift exchange between our team members. The past year was no exception. 30 team members from 12 countries  participated in this wonderful event.


Albina Manning was the hostess for this fun gift exchange. Every participant was assigned a person to whom she (he) anonymously gives a gift. Participants also did not know from whom they will receive a present.

It was a lot of fun to unwrap those packages. So, let us share our secrets and show you the chain of Holiday gifts of 2012!


Monday, July 9, 2012

Summer necklace giveaway

This lovely necklace from Arthandmadejewelry shop can be yours if you will participate in our new giveaway! 

Irina's jewelry is a perfect choice for teenagers and young adults. Join our giveaway for a chance to win one of her lovely summer necklaces for free!

Just follow these simple rules to enter the giveaway:

1. Visit Arthandmadejewelry shop, browse her collection and leave a comment here on what you like the best (1 entry)

2. Heart Arthandmadejewelry shop (1 entry)

3. Heart Iryna's second shop, Modern101 (1 entry)

4. Pin or like Irina's necklace on Pinterest (1 entry)

5. Follow/ subscribe Russian Artists blog (1 entry)

6. Grab our button and place it on your blog (1 entry)

7. Follow / subscribe/ like Arthandmadejewelry facebook / blog / pinterest (1 entry each)

8. Share this giveaway on twitter / facebook / your blog / (2 entries)

Please leave a separate comment on each entry and don't forget to leave us your email address so that we could contact you!

If you'd like to see more of Arthandmadejewelry creations please visit her shop on Etsy!

This giveaway will run from July 9 through the July 23th, and the lucky winner will be announced on July 24h, 2011.

Wednesday, June 27, 2012

Happy 4th of July!

Celebrate the red, white and blue with fireworks, great food and our one of a kind creations. 

 Just type rusteam in your search box on Etsy to see what new items we made for you!

Have fun browsing!

Wednesday, May 23, 2012

Father

He may not be perfect. No one is. You love him simply because he is your Dad.


He played with you when you were little by throwing you up into the air; he let you climb to the top of things; he took you on your first camping trip…

Even though he does not say it very often, you know he loves you. With him you feel protected and safe.

Dad is an important part of your life.

Choosing a gift for Father’s Day can be tricky. Something sweet and pretty does not quite do it for most dads. He may prefer cool and functional.
Or he may like classic and functional.


Our team has prepared a variety of gifts for fathers that you can check out here. Happy shopping!

Story by Yana (WineCountryLife)

Monday, April 30, 2012

A card for your mother

Today Alisa from GraphicMarket shop on Etsy is sharing great story and ideas for making a greeting card.

We all have our own little traditions, the way we do things – my personal little obsession is card making. Christmas Cards, greeting cards for birthdays, thank-you cards and so on. Of course we never have time for such things, but the process can be so relaxing that you can make cards for half a year ahead just in one go.

Lot’s of my friends told me that they are waiting every year for my Christmas card to arrive. It was so sweet when I realized that people are keeping my cards, they don’t throw them away! It makes my hobby very special.

Here you can see my latest creations that will suit perfectly mother’s day theme.

For this project you will need:
 - Thick cardboard (I used watercolor paper)
 - Ink (or a felt pen)
 - Ribbons (preferably 2 shades and 2 different width)
 - Glue (any paper glue will do, but I prefer to use double sided tape, it creates less mess)
 - Printable digital paper or digital collage sheet – that’s my favorite! This magic stuff turns any card into a masterpiece! Try to find 2 matching patterned papers, just like I did – polka dot and flower pattern – they work well together) I used a usual printer to print the patterns on A4 format thick paper.

That's probably all we will need. :)

For your cards you can try the ideas on the photos. At fist glance it seems you really need to have some drawing skills, but look again and you’ll notice that the best cards that I made are dead simple!

For example little cute dress on the drying line – easy to make and it’s such a cutie! Or hearts in the shapes of balloons – that’s another great idea for you – be creative and be confident – you’ll get it right)

Tips:
  • Simplicity is the key! Keep it simple, keep it fresh and don’t clutter all you scrap booking elements on one card. Even if you put just one shape out of scrap booking paper (a heart for example) and write a name of the recipient underneath it will look stylish and elegant
  • Have a color scheme. 1-2 colors that work together will look better than a rainbow of all your favorite colors together
  • Add personal touches – even if it’s just a hand written message or doodles around the edge – it will help your card to stand out and will show the recipient your true affection.
  • Ribbons and bows are simple but very effective tool in card making - they are cute and they add 3D to your card. (The easy way to attach the ribbon, when you’re using it horizontally, is to make a little cut at the side of the card, thread the ribbon through the hole and glue both ends of the ribbon inside the card – you’ll get clean ends of the ribbon and no glue on the front of the postcard) 
You can find lot’s of cute scrapbooking materials in my shop (GraphicMarket) so next time you are thinking about card making or just need a background for your website, please stop by.

I highly recommend card making as a hobby. Scrapbook collages made it so simple and enjoyable. Just try to make a card yourself next time you’re invited for a birthday party or mother’s day!

Lot’s of my friends told me that they are waiting every year for my Christmas card to arrive , it was so sweet when I realised that people are keeping my cards, they don’t through them away – it makes my hobby very special.

Be creative and have fun!

With love,
Alisa (GraphicMarket)

Friday, April 27, 2012

Interview with a Star - Irina (IrenkaR)

Today, we would like to introduce one of our team mate Irina who runs IrenkaR shop on Etsy.


Polymer clay jewelry


Please tell us a little bit about yourself
Actually, I’m a self-taught artisan and making jewelry is my hobby. I am an economist, but I have learned sewing, knitting, and inventing all kinds of interesting things from my mother. I love the creativity and extraordinarily creative people. In my childhood I dreamed of being a designer. My daughter, Ann, has made my dream come true without even realizing it. Now she is a 1st year student at the National Academy of Art in Lviv. By the way, my daughter is my first and the most serious critic.

Polymer clay jewelry


How long have you been creating? How did your journey in art and creativity begin?
I have been making polymer clay jewelry for only 2 years. Initially, I bought it for my daughter, she loves to sculpt. I looked for the tutorials and bought all kinds of tools for her and then noticed that I myself was exited to do all this. I fell in love with polymer clay immediately, right when I for the first time took it into my hands. There are so many opportunities for creativity!

A long time ago I made jewelry for myself and for friends at school - we really wanted to be unique. Later, I saw jewelry from polymer clay in the Internet community. Now I make it myself. Now my daughter and I have a common hobby - she also makes jewelry and all her friends wear earrings made by her.

Polymer clay jewelry

What items do you carry in your shop?
My original works - fun brooches from polymer clay - dolls, princesses, ballerinas, little mermaids and a collection of winter brooches (kids in the big winter hats) - are represented in my shop. Also, I like to make polymer clay jewelry with imitation of knitting, and with bright prints, I like to use different textures and materials: fabric, handmade lace, beads. It’s interesting for me to experiment and I want to share my findings with everyone. My daughter wears earrings, brooches and bracelets made by me with pleasure, she takes them first! So that’s why I make many items again specifically for the shop IrenkaR

Do you have a favorite item you have made? What items in your shop do you most enjoy making and why?
I love all of my works because I put in them my warmth and love. And my favorite is a brooch of a girl with the mittens on lace . This brooch probably has a connection with something from my childhood. I love to make this design over and over again, but these brooches are never exactly the same.

Polymer clay jewelry

What is the best reaction you have gotten from one of your pieces?
Frankly speaking, a reaction to my brooches inspired me to make them again. I'm glad to make people happy with my works, I like when my works make my customers smile and cheer them up. It is really great! I think I make this world a little bit kinder. That’s why the slogan of my shop is "Cute brooches and other jewelry for a good mood»

Polymer clay jewelry


What are your best marketing tips?
I really like Etsy, which helps us to learn about marketing of a small business. But the best marketing tip I think is: «do what you like and do it well».

I hope it was interesting for you.

Yours, Irina Rybak

Sunday, April 22, 2012

Crochet necklace bracelet giveaway results


We are happy to announce the winner of our crochet necklace/bracelet giveaway!


Comment # 19 by Elena V was chosen as a winner. Congratulations!
 Irina (TomBjornDesigns) will contact you to verify your mailing address.

Congratulations to the winner and thank you for participation, everyone!

Wednesday, April 18, 2012

How to be eco friendly

This coming Sunday April 22nd is Earth Day. It’s the day when we celebrate the environment and all the things we can do to be kind to the earth.

Do you need some ideas? Listen up (or to put it more literally - read on).

First of all, consider using vintage items rather than buying new things. There are so many great vintage finds out there that you can use in your house.
Choosing vintage clothing is another great idea. You’ll look unique and you’ll be sure that no one else shows up to the party wearing the same dress you are wearing.
You can also consider buying upcycled products. There are many things that talented artists make out of used products. Check out this wall clock. Isn’t it cool?

I personally love jewelry and accessories made out of upcycled computer parts. So modern and stylish!


Even your iPhone or iPod case can be made out of recycled materials.

So look around and make conscientious choices. Go for handmade items rather than factory produced. They are more unique and don’t leave a footprint on the environment.

Choose natural materials that are renewable.


Go for an organic option of whatever you want to buy.
Make it a habit to choose reusable products rather than their disposable alternative.


And remember even little changes can make a big difference. Happy Earth Day!

Story by Yana (WineCountryLife)

Monday, April 16, 2012

The chalkboard tag tutorial

Today, Mary and Daniel who run chalkboardthings store on Etsy are sharing a great tutorial how to make this cute chalkboard tag.


Spring! It’s time to turn to gardening and home decor. Today we will show you how to make a chalkboard tag on a clothespin for your flowers or your table decor or whatever you like :)


In our studio we are making all sort of chalkboard things - from mirrors and frames to wall clock and children puzzles. We have a secret receipt for a chalkboard paint, but you can buy it in artists shop. It is matte and it has a special chalk-texture. You can draw and write on it with any chalk and erase with a cloth. It is water resistant.


So, to make a small chalkboard tag (aprox. 7x5 cm) you will need:
piece of plywood (we are using 4 mm)
pencil and ruler
fret saw
sandpaper
tape
white paint, brushes, chalkboardpaint
clothespin and glue

Don’t be afraid - it is easy. We will show you how - step by step.
Draw a shape of your future tag.


Cut it with a fret saw.


Round the edges - it is not necessary, but looks great!


Make it white - paint both sides with white paint (we are using acrylic colours). The more layers - the better. We are doing it twice or thrice. Leave to dry.


With the help of the tape make future chalkboard surface.


Put 3 or 4 layers of chalkboard paint and let your future tag dry.


Remove the tape. Glue the spin!


That’s it! Your chalkboard tag is ready. You only have to take a piece of chalk and draw or write anything you want.


Story by Mary and Daniel (chalkboardthings).
Related Posts Plugin for WordPress, Blogger...