Social Icons

Pages

Showing posts with label tutorial. Show all posts

Friday, July 21, 2017

A lavender wand sachet DIY

July is a perfect time to gather some aromatic lavender and make some sachets to refresh your linen closet. You can make then in different ways, like traditional cute mini pillows, poaches and linen ornaments or you can make a lavender wand. 
The photographs below belongs to our team member, Irina from Belarus (JewelryFloren*). She got so many blooms in her garden this year that she was able to make 25 pretty lavender wands  from just 2 lavender bushes.

Here is what you need to make 1 lavender wand like hers:
25 to 30 fresh cut lavender stems
2 1/2 yards of 1/4" wide satin ribbon in color of your choice
sewing thread.

Сlean your lavender stems from the leaves and bottom flowers. Gather them together and tie the stems tight right under the flower heads with a sewing thread. Now, bend the stems to the sides to cage the flower heads inside. Run one end of the ribbon along side the flowers to poke out of the bottom of the flower cage.
Tie your pretty satin ribbon on top of sewing thread and start weaving the other loose end of the ribbon around the top of flower cage using basic under-and-over basket weaving technique. Push the sticking-out flowers back to cage with a toothpick. Keep weaving tightly (very important since the lavender will shrink as it dries) to get a bottle shape.

Tie both ribbon ends tight around the base a few times and make a pretty bow. Isn't it pretty?
Let it dry and it is ready to be used!

*Have you seen Irina's shop? It is full of pretty flowers made of cold porcelain or polymer clay. Bloom which will never fade!

https://www.etsy.com/listing/257924123/lilac-brooch-flower-gift-for-women?ref=shop_home_active_2
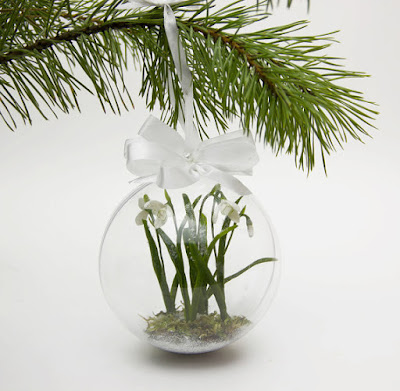
Here you will find a very pretty floral jewelry, hair accessories and decoration pieces. My personal favorite is this gentle winter snowdrops caged in a sphere. What a sweet Christmas ornament!

https://www.etsy.com/listing/256501498/christmas-tree-christmas-tree-decor?ref=shop-shares-comp-listing
Best wishes to you, our readers. Enjoy your summer!

Sunday, June 19, 2016

Crochet Wash Cloth #etsycraftparty

If you ever plan to give a gift of pretty soaps, lotions, shower gels or other body care products, the handmade washcloths would be a lovely addition to the gift package. 

This tutorial is a part of our virtual etsy craft party and is offered by goodweather shop. Please enjoy!

https://www.etsy.com/listing/230780505/crochet-wash-cloth-spa-cloth-cotton?ref=shop_home_active_2
You will need:
size H/8-5.00 mm crochet hook 
Cotton worsted yarn

Make 30 chain stitches (cs)
Yarn over. Skip first 2 cs 
Insert hook in the center of the 3rd chain from the hook.
Yarn over...
Draw through 3 loops on hook
(one half double crochet complete)
Repeat across to end of foundation chain.
You need to turn your work to start Row 2. 
Chain 2 (ch 2) and yarn over the hook (yo). 
Skipping the first stitch of the row directly below the turning chain, insert your hook in the next stitch. 

Friday, June 17, 2016

Our giveaway, washcloth & eco soap nuts! #etsycraftparty


Here is another great giveaway by Nataliya (NataliyaMalik ) ! This great set of felted washcloth & eco soap nuts is all about natural materials! 
The washcloth is made of wool. The soap nuts contains saponin, a natural alternative to chemical laundry detergent and cleansers. When in contact with water, it creates mild suds, which is similar to soap.

Please do any (or all) steps below to enter. The more you do, the more chances to win!

Leave a separate comment on each entry and don't forget to leave your email address here in comments or send it to us throughconversations on Etsy so that we can contact you if you win! 

The entry period for this giveaway is from June 17 through the June 19th. The lucky winner will be announced on June 20th. This giveaway is for US residents only.

1. Visit and heart  NataliyaMalik shop, browse her collection and leave a comment here on what you like the best (1 entry)
2. Follow / subscribe Nataliya's blog (1 entry)
3. Like Nataliya's page on Facebook (1 entry)
4. Follow/ subscribe this blog (Russian Artists blog) (1 entry)
5. Share this giveaway on your social medias ( pinterest, twitter, facebook, instagram, your blog) - 2 entries

Good luck, everyone!

Felted brooch to give away! Etsy Craft Party 2016

This lovely felted brooch can be yours if you will participate in our giveaway! It is handmade by Nataliya (NataliyaMalik ) and kindly offered for our virtual Etsy craft Party.

This aqua blue and apricot brooch made of soft wool, fiber silk and cat eye beads and is approximately 8" in diameter. A lovely accessory for a coat, jacket, scarf or handbag embellishment!


The entry period for this giveaway is from June 17 through the June 19th. The lucky winner will be announced on June 20th. This giveaway is for US residents only.


Please do any (or all) steps below to enter. The more you do, the more chances to win!

Leave a separate comment on each entry and don't forget to leave your email address here in comments or send it to us through conversations on Etsy so that we can contact you if you win!

1. Visit and heart  NataliyaMalik shop, browse her collection and leave a comment here on what you like the best (1 entry)
2. Follow / subscribe Nataliya's blog (1 entry)
3. Like Nataliya's page on Facebook (1 entry)
4. Follow/ subscribe Russian Artists blog (1 entry)
5. Share this giveaway on your social medias ( pinterest, twitter, facebook, instagram, your blog) - 2 entries


Good luck, everyone!

Saturday, December 5, 2015

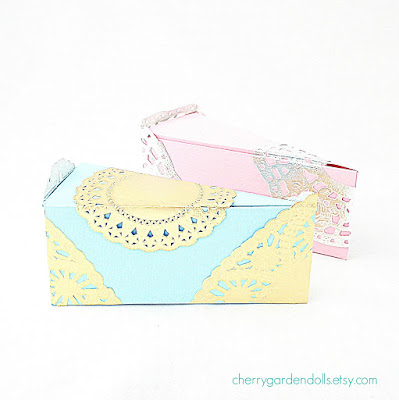
How to make a cake slice paper box


Do you or your friends like cakes and gifts? I am sure, yes, you do! So let's make this great cake slice paper box to surprise them with great handmade packaging and your  craftsmanship!

This  box is easy to make. All you need is a scissors, a glue stick, a plastic or wooden ruler, craft paper 210gsm and decorative elements of your choice.
https://www.etsy.com/shop/CherryGardenDolls

Here is the pattern for the 14.5cm long by 6 cm tall cake slice box. You can change the measurements to the size you need for your own projects.

To assemble, simply cut around the design, score and crease along each fold, glue the  tabs to form the shape of the box, then slot the two end flaps and close on top of each other. Decorate to your liking.


Make 12 of these and you will get a full cake. Have fun crafting!


Thursday, October 29, 2015

How to make a felted ghost for Halloween

Some of us will most probably decorate our homes for Halloween. I would like to share an idea of a DIY project of making felted ghosts for Halloween.


We will need white and black felting wool, a glass to use as a form, soap, water and a piece of bubbled wrap paper.


On a piece of bubbled wrap paper put an empty glass upside down. Slowly start to cover it with white wool. It makes sense to water the surface of the glass beforehand so that our pieces of wool could stick to it. Once the glass is all covered with wool it's time to wet our wool with soapy water. It makes sense to water it slowly so that our wool doesn't fall off the glass and stays there covering it nicely. Once white wool is wet we can start making our ghost's "face".


With a piece of black wool make an eye and attach it to our white ghost. It's much fun to experiment with sized and eye position as our ghost's face expression will change dramatically depending on what shape and size ghost's eyes will be.

Once all the wool pieces are at place we can start the felting process. Carefully wrap bubbled paper around our glass and start rubbing it. Be gentle so that our wool doesn't fall off the glass. Once wool fibers become inseparable and our white form turns into a firm piece of felted wool it's time to rinse it.

To dry it well I let it sit on a glass overnight. Thus, the original form of the glass will be preserved and whet our ghost is nice and dry it will stay firm and round. I've attached a thread on top of it so that I could hang it anywhere in my room or outside. My little white ghost turned out to be not scary at all. But it's all in your own hands. Designing the ghosts face is the most creative part of the whole process!


Story By Tonya (CityCrochet)

Wednesday, October 28, 2015

Last minute Halloween projects from Russian Artists

There is just a little bit time left for decorating for Halloween. If you are hosting a party here is some ideas for a last minute crafts and food from our team members blogs:

Falling leaves decor tutorial from Alecia's (Artctida) blog:
http://arctida.blogspot.se/2012/11/diy-autumn-home-decor-falling-leaves.html
 
Black cat free cross stitch pattern from Vita's (DwarfsTreasure) blog:
http://silvercutedwarf.blogspot.com/2011/10/halloween-is-coming.html

Printable wine glass tags from Irina's (graphicland) blog (free image):
http://irinascutebox.blogspot.com/2011/09/halloween-printable-tags-for-wine.html


Appetizers ideas and recipes from Tanya's (socksandmittens) blog:
http://socksandmittens.blogspot.com/2014/10/halloween-party-food-ideas.html


There are so much more great project ideas you will find in our shops on Etsy. Happy Halloween!

https://www.etsy.com/listing/62541426/victorian-halloween-ephemera-digital
Victorian Halloween ephemera digital collage sheet by karisagraphic

https://www.etsy.com/listing/158370948/digital-download-abstract-ink-drawing
Digital download abstract ink drawing by AlPlo

https://www.etsy.com/listing/83349506/printable-victorian-halloween-gift-tags?ref=listing-shop-header-3
Printable Victorian Halloween gift tags digital collage sheet by graphicland

https://www.etsy.com/listing/197740664/halloween-digital-collage-sheet-15inch
Halloween digital collage sheet by MyMidnightMoon


Wednesday, September 24, 2014

Nautical style decoupage box DIY


Handmade is always a great gift from the heart. Today Stella from ShimmerPlace will show us how to turn an ordinary unfinished wooden box into something special. The box Stella is decorating is ocean themed but you can always use some other image to suit your  occasion.
Materials:
* Unfinished wooden box with a lock
* Scissors
* Brushes
* Glue
* Hair spray
* Sponge
* Acrylic paints of different shades of blue
* Glitters (optional)
* Varnish
* Printed picture that you will put on your box. A picture can be cut from the decoupage cards or downloaded from the Internet and printed.
 
How to do it:

Step 1: Remove the lock from the box and place aside to keep it clean.

Step 2: Paint your box using brushes, sponge and acrylic paints. Stella also created a waved texture looks on her box by using some paint and sponge.

Let it dry.

Step 3: Cut out your picture and glue it to the lid. If you use the image printed on your home printer, spray it with a hair spray and let it dry.

Step 4: If you'd like, decorate your box some more. Use some colorful glitters to add  some details or draw some more images on your box. Stella drew some star fishes on the sides and the bottom of the box to match the top. Let the glitter dry completely.

Step 5: Paint your box inside in the color of your choice and let it dry completely.

Step 6:  Apply a thin layer of varnish on the box. Let it dry and attach the lock.
 
Stella's cute ocean theme box is ready! A lovely piece to decorate a house or to give as a gift.

If you like this box but don't want to make it yourself stop by by the Stella's shop, there are so many pretty boxes to see! Or ask her for a custom order!

Thursday, September 11, 2014

Machine knitting, seamless sweater


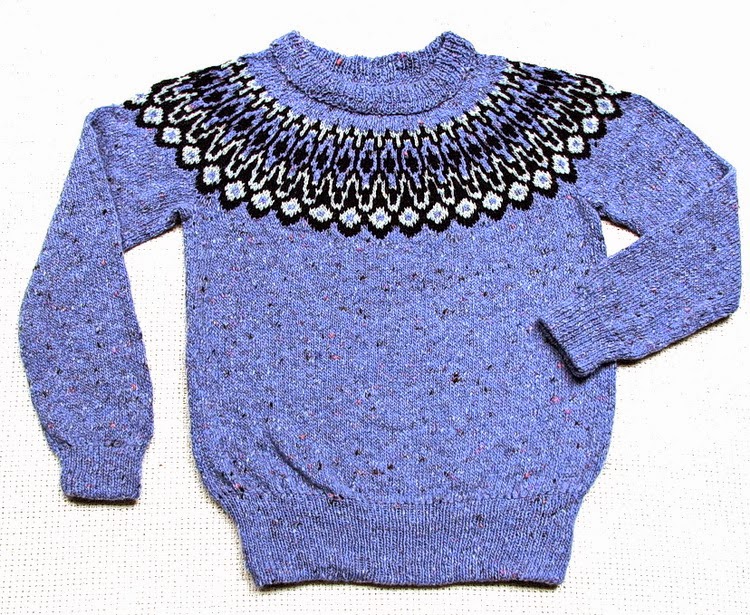
Fall is here and we are all getting ready for the holiday seasons. If you love to knit and have a knitting machine, this knitted sweater might be exactly what you need to make for someone you love. Lyudmila from woolsolution made one for her shop and shared how to make it with us.
https://www.etsy.com/transaction/226519754?
This article is NOT a pattern description and is intended to help knitters with some experience to save time and speed up knitting process.  This technique is suitable for some adult knitwear and works great for children’s sweaters, cardigans and vests. As a result the garment is seamless and provides comfortable fit.

If you have a knitting machine with a ribber attachment check the manual for tubular knitting.

Before starting the project knit a swatch and do all necessary calculations. Set up the carriage to knit fabric clockwise and use a waste yarn to cast on EON (Every Other Needle).

You will knit front when carriage  moves from right to left and back of the garment when carriage moves from left to right. Keep in mind that a row counter at the end should show required number of rows times fore for mock ribbing and times two for the rest part.  When you reach  required depth of mock rib  (Number of Rows times 4) bring all needles into work and continue knit clockwise to reach required rows for front/back.

Sleeves
With all mentioned above considerations  work each sleeve at a time increasing one stitch in every 8-10th row on one side.
Machine part is over. Now combine stitches on a circular needles skipping 8 or 10 (4-5 sts on both sides of the imaginary seams)  stitches in under arm area on sleeves and the body of the future sweater. Continue knitting forming raglan or round yoke and bind off at neck line.

This color schema includes stitches decrease instructions. Before start yoke make sure your number of stitches is dividable by 8 in order to get whole number of the given motif.


Sunday, May 25, 2014

Decorative fabric wrist cuff/ bracelet tutorial


Spring and summer is the best time to show your pretty handmade accessories, especially the ones made of fabric, threads and cutest little buttons. Just one interesting piece might take care of the rest of your outfit!

We loved this fabric wrist cuff tutorial from Owlweaver shop on Etsy for a lovely look and detailed instructions. Yulia, the author of this project is kindly sharing the step-by-step instructions with us today. 
https://www.etsy.com/listing/180491640/cuff-lace-bracelet-with-beads-for-her?ref=shop_home_active_9
 Materials you will need:
1. Main fabric, fusible web & backing fabric. You can dye white fabric in a coffee to get an antique/vintage look.
2. Brads, gems (stones), beads and other decoration stuff you want to see on your future bracelet.
3. Different kind of ribbons or lace - whatever your heart desires.
4. Fishing line (not necessary, you may use a simple thread – it is for beads, stones and I sew a back side with the help of fishing line)
5. Buttons and elastic cord for buttons loops, approx. 2mm wide.
6. Sewing machine, threads, needle and other sewing accessories.
7. Pencil, ruler and paper for C.

The process:
1. First, we have to make a sewing template and use it to cut a fabric. The circumference of my wrist is 16,5cm and I want my cuff to be 11,5 cm wide, so the top of a cuff it’s supposed to be not less than 22cm. The measurements of the trapezoid template I’ve used were 25.5cm(top of cuff), 19.5cm (bottom of cuff) and 12.5 cm high.
Then fuse two pieces of fabric together by ironing if the fabric is thin. Make sure you have placed the adhesive side toward the back side of the fabric. Cut the main and backing fabric using template.
2. Prepare ribbons, ruffles and lace that you are going to use as well as other accessories.

3. Work out edges of the main and back fabric with zig-zag stitch.
4. 1st "tier". Choose the widest lace, which will be placed near the wrist and ruffle it. First I tack, then sew it on a sewing machine.
5. 2nd “tier “- pinned on the top of the 1st "tier" strips of tulle (I like to use it, it good separate layers or "tiers" of lace).  
6. If you don’t have initial design just use your intuition and inspiration and everything comes up spontaneously. The next “tier” is crinkled decorative elastic band. I stitched up to the middle and then I decided to make a flower. You can do the same or just continue sewing a layers (“tiers”). It may be pieces of fabric (it looks good when you tearing fabric, don’t cut with scissors).

7. Continue decorating the foundation until you’ll receive a desire result.


Next, make a button loops (1):
2.  Attach the elastic cord on the one side of the bracelet.
3. Tack in a lining to the front side of the bracelet. Put a back side fabric a little bit lower in the direction to the lace. Stitch using machine three sides of your bracelet (except the side with the lace) .

4. Turn out the bracelet, iron it on all sides.
5. The lining part turn inside and stitch with the blind stitch with the thread or fishing line like in my case. 
6. And the final item! You have to sew buttons and, congratulation, your bracelet is ready!
Have a great summer and thank you for your attention!
 ............

Yulia has just started on her new blog so we are expecting more wonderful tutorials from her!

Related Posts Plugin for WordPress, Blogger...