Social Icons

Pages

Showing posts with label felted brooch. Show all posts

Friday, June 17, 2016

Felted brooch to give away! Etsy Craft Party 2016

This lovely felted brooch can be yours if you will participate in our giveaway! It is handmade by Nataliya (NataliyaMalik ) and kindly offered for our virtual Etsy craft Party.

This aqua blue and apricot brooch made of soft wool, fiber silk and cat eye beads and is approximately 8" in diameter. A lovely accessory for a coat, jacket, scarf or handbag embellishment!


The entry period for this giveaway is from June 17 through the June 19th. The lucky winner will be announced on June 20th. This giveaway is for US residents only.


Please do any (or all) steps below to enter. The more you do, the more chances to win!

Leave a separate comment on each entry and don't forget to leave your email address here in comments or send it to us through conversations on Etsy so that we can contact you if you win!

1. Visit and heart  NataliyaMalik shop, browse her collection and leave a comment here on what you like the best (1 entry)
2. Follow / subscribe Nataliya's blog (1 entry)
3. Like Nataliya's page on Facebook (1 entry)
4. Follow/ subscribe Russian Artists blog (1 entry)
5. Share this giveaway on your social medias ( pinterest, twitter, facebook, instagram, your blog) - 2 entries


Good luck, everyone!

Wednesday, April 25, 2012

Preparing for Prom

The school year is coming to the end. For some students these are their last days at school and the time to prepare for Prom.


If you are a girl the dress of course is essential. You want to look one of the kind.


Accessories are very important too. Brooches are a great way to add some flair.


Choosing the right hair accessories can spice up your look as well.


The right jewelry piece will emphasize your beauty.


And if you are a proud parent of a graduate we congratulate you and invite you to check out the wonderful gifts prepared by the Russian Artists Team!

Story by Yana (WineCountryLife)

Monday, June 20, 2011

Tutorial How to make a felted flower brooch

Galafilc creates amazing and unique hand felted items. Today she will share her know-how on how to create a felted flower brooch.
https://www.etsy.com/shop/galafilc
To create a flower we will need about 20 gr. of white felting wool, plastic bubble wrap, soap, water, dye for coloring and a wooden roller.

The first step is to lay out pieces of wool on a bubble wrap. We will make six circles slightly different in size.

The second step is to wet our wool with soapy water. We spray the water evenly all over the wool and cover it with another piece of bubble wrap. Our wool is now ready for felting. At the very beginning we roll our wooden stick over the wrap once to squeeze extra water out of our wet wool. After that we roll our wrap around the wooden stick and start actually rolling it on a flat surface. I usually roll it about 100 times in one direction and 100 times in another direction.


Our wool is semi-felted now. We take it out of the wrap and gently squeeze and rub it in our hands until it is ready. Our pieces of wool should be pretty homogeneous with fiber intact and not separating. If the wool has felted well the original size of the piece changes. Our wool circles should be much smaller in size than the original ones.

Now we are ready to start creating an actual flower. We cut out a flower from each of the circles and felt the flowers a little bit for the edges to felt and become even. We rinse our flowers well and flatten them. It's time to form a flower now. We put the biggest flower at the bottom and the rest five flowers on top of it.

To dye our flower we will need to soak it in a vinegar first. For the final color not to be super bright I usually add a few drops of black dye to my dye mix. To prepare my dye mix I just mix dye with water. I soak my felted pieces into the dye mix and warm in up either in a micorwave or on a stove. I usually let my felt stay in the dye mix for about an hour. Finally I put my felted pieces into a vinegar once more to fix the color and let them dry afterward.

My brooch flower is almost ready. I assemble all the pieces into a flower brooch and attach a pin at its back. Our beautiful and unique hand felted flower brooch is ready!


translated by TonyaUtkina

Saturday, February 12, 2011

Calla brooch giveaway results

Good morning to all,


Are you excited to find out who won a Gala's giveaway? We thought so :)


RizalaYa did! Her comment # 44 was chosen as the lucky winner by Gala (galafilc) and random.org.

Now this beautiful calla lily in a couple of days will be carefully packed and sent to RizalaYa address!

Congratulations on your win, rizalaYa!


Thank you for participation, everyone!

Monday, February 7, 2011

Felted heart brooch tutorial

This great heart shaped brooch is fun to make with easy to follow instructions and colorful photographs by Tanya (soroka)

To make a heart like this you'll need:
natural undyed wool batt
red wool batt
felt needle #46, #48
foam sponge or a special brush for felting
Pin back

Make a middle part of your heart:
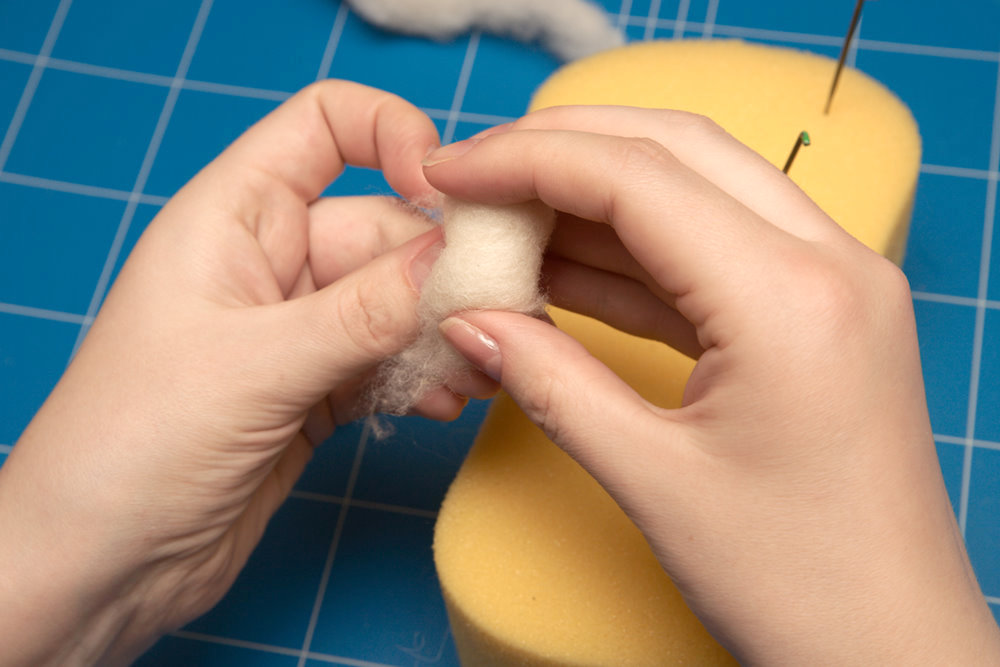
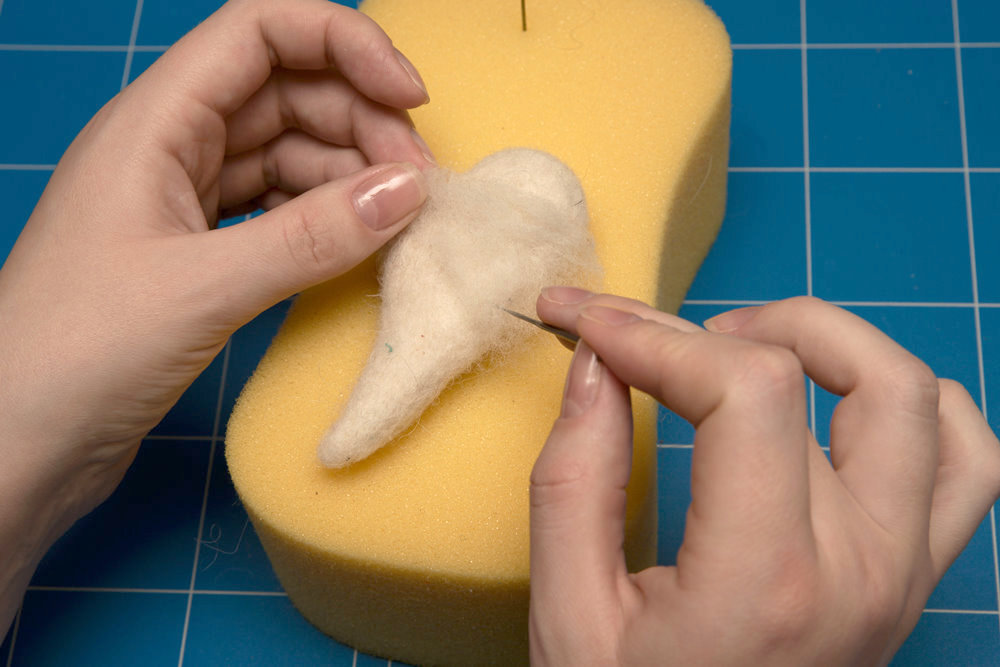
Take a fist size amount of natural undyed wool and form a triangle. Poke through the wool evenly with needle #46. The special notches on the tip of the needle will engage the fibers and push them deep into the product. Make sure that needle passed through the whole piece of wool. Use the foam sponge as a working surface to protect your fingers from the wounds.
Make a top of your heart:
Take 2 small pieces of undyed wool, about 1/4 of initial volume and roll them into beads. Leave the end of each bead unfelted:

Attach one bead with unfelted end to the left side of your triangle. Gently needle bead to the base to connect them. Repeat with the right side.
When the whole piece is holding together well and resembling a heart needle all over the piece to secure the fibers on the surface.
Continue working all over the heart shaped base until it will reduced in size and become firm. At this point you will not be able to stick a needle in it anymore.

Take a look at your heart. It should be firm with smooth surface. If you see some small unperfections simply add some more wool to the spot and needle it to the base.

Cover the base evenly with thick layer (about 1/2") of red wool and slightly needle it with needle #48.

When all fiber is attached start needle felt it all over until the surface of the heart is evenly coated and very smooth. Do not needle through your piece. Add some more of red wool fiber if needed. Continue needle felt until you are happy with the results.

Your heart is ready. If you like it like it is it's time to attach pin back and enjoy your new brooch.
If you'd like to proceed and try a wet felting technique you can wet your heart with warm water and soap and gently rub with your fingers. At this point you can also shape it some more. Rinse it with clean water, gently squeeze the excess of liquid and let it dry overnight or until dry.

If you like you can embellish your new heart with embroidery, beads or bows. Sew the brooch pin on the back and enjoy your new brooch!

If you like this brooch but not into felting you can purchase the one like this from Tanya's shop! Please visit her shop today to see the wonderful selection of her felted items!

Tutorial by Tanya (soroka)
Translated by Tanya (Socksandmittens)

Monday, January 31, 2011

New giveaway, a felted calla lilly brooch!

A new giveaway today - yey! Gala (galafilc) is hosting it today.

Her charming felted flower brooch just found her new owner in December and here is another gift for you today:

This gorgeous calla lily can be yours! Just follow our few simple rules to enter this giveaway:

1. Visit her shop, browse her collection and leave a comment here on what you like the best (1 entry)

2. Heart Gala's shop (1 entry)

3. Follow/ subscribe our blog (1 entry)

4. Grab our button and place it on your blog (1 entry)

5. Follow / subscribe Gala's twitter / facebook / blog / flickr (1 entry each)

6. Share this giveaway on your twitter / facebook / blog (2 entries)

Please leave a separate comment on each entry and don't forget to leave us your email address so that we could contact you!

If you'd like to see (or maybe, even purchase) more of Gala's creations please visit her shop on Etsy!

This giveaway will run from February 1 through the 11th, and the lucky winner will be announced on February 12th, 2011.

Have fun and good luck!

Monday, January 10, 2011

Tutorial Felted Poppy Flower

Today, Yana (YanArt) is sharing a tutorial how to make this great felted poppy flower.


To make a poppy brooch you will need:

- metal fastener
- black thread
- semolina
- acrylic paint (black/gray)
- PVA glue (polyvinyl acetate glue)
- bubble wrap
- wooden roller
- wool for felting (red, black, gray and green)


1. Spread out thin strands of wool on the piece of film in the shape of the circle. Begin from the center and move to the edge – do not do it in a different order! Make sure there are no spaces between the strands, otherwise there will be holes. Put the green wool in the middle but use a little less as you will add some black and some gray wool there as well.

2. Now you have to soak the wool in soap solution – just to make it damp. If you use too much solution the wool may shift! Cover the wool with another piece of film and with gentle pushes of your palm evenly soak the wool and foam up the solution.

3. Slightly press the film with your hands in circular moves. Turn the film upside down and remove the upper layer of the film. Be careful not to pull out the strands – they are not felted yet! What you see in front of you is the inside. Bend the edges of the circle (0.5 – 1cm) to make sure the petals of your poppy are neat.

4. Wrap the film with the wool around the roller and roll. Reel it out, spread out if needed, wrap around the roller from the other side and roll again. Reel out and make the incisions of the petals: cut the circle in 4 places and make the edges of the petals round. Roll again. After that use your fingers to rub the petals to give them the round.

Rinse and put the flower into the drying cup for several hours (over night).

5. Using the red wool and the same method make the second circle – this will be the upside (lower) layer of the poppy petals.

6. Now it’s time for the middle of the poppy. Use the green wool to arrange an oval bead (according to the size of the petals): dip the lump of green wool into soap solution and roll it between your palms. Rinse under the running water.

Form another round bead and squeeze it between the palms to make it flat. Leave them to dry.

7. Let’s make the filaments. Wrap the black thread around your fingers and cut it from the one side.
Cover the thread with glue (to give it firmness), then dip the tips into the
semolina. Hang out to dry. After drying tint them a little with black or gray paint.

8. After everything is dry, sew the flat green bead through with the black thread to make
your flower look like a real poppy. Sew it to the oval bead.

9. Assemble the threads-filaments into several beams and sew them to the first layer of the petals.
Place and sew the green middle.

10. Put the second layer of petals underneath and sew everything together – all the layers and the metal fastener.

Our poppy brooch is ready!

Saturday, November 27, 2010

Christmas Giveaway results!


... and the winner of our Christmas giveaway is Salleefur/Jesslyn/Jesster !

Her comment #81 was chosen as a winner by random.org generator:


Congrats to the winner and thank you for participation, everyone!
Related Posts Plugin for WordPress, Blogger...