Social Icons

Pages

Showing posts with label tutorials. Show all posts

Friday, July 21, 2017

A lavender wand sachet DIY

July is a perfect time to gather some aromatic lavender and make some sachets to refresh your linen closet. You can make then in different ways, like traditional cute mini pillows, poaches and linen ornaments or you can make a lavender wand. 
The photographs below belongs to our team member, Irina from Belarus (JewelryFloren*). She got so many blooms in her garden this year that she was able to make 25 pretty lavender wands  from just 2 lavender bushes.

Here is what you need to make 1 lavender wand like hers:
25 to 30 fresh cut lavender stems
2 1/2 yards of 1/4" wide satin ribbon in color of your choice
sewing thread.

Сlean your lavender stems from the leaves and bottom flowers. Gather them together and tie the stems tight right under the flower heads with a sewing thread. Now, bend the stems to the sides to cage the flower heads inside. Run one end of the ribbon along side the flowers to poke out of the bottom of the flower cage.
Tie your pretty satin ribbon on top of sewing thread and start weaving the other loose end of the ribbon around the top of flower cage using basic under-and-over basket weaving technique. Push the sticking-out flowers back to cage with a toothpick. Keep weaving tightly (very important since the lavender will shrink as it dries) to get a bottle shape.

Tie both ribbon ends tight around the base a few times and make a pretty bow. Isn't it pretty?
Let it dry and it is ready to be used!

*Have you seen Irina's shop? It is full of pretty flowers made of cold porcelain or polymer clay. Bloom which will never fade!

https://www.etsy.com/listing/257924123/lilac-brooch-flower-gift-for-women?ref=shop_home_active_2
Here you will find a very pretty floral jewelry, hair accessories and decoration pieces. My personal favorite is this gentle winter snowdrops caged in a sphere. What a sweet Christmas ornament!
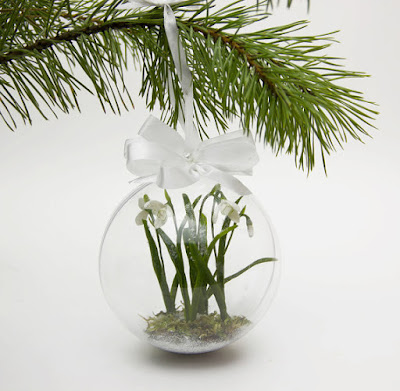
https://www.etsy.com/listing/256501498/christmas-tree-christmas-tree-decor?ref=shop-shares-comp-listing
Best wishes to you, our readers. Enjoy your summer!

Sunday, June 19, 2016

Crochet Wash Cloth #etsycraftparty

If you ever plan to give a gift of pretty soaps, lotions, shower gels or other body care products, the handmade washcloths would be a lovely addition to the gift package. 

This tutorial is a part of our virtual etsy craft party and is offered by goodweather shop. Please enjoy!

https://www.etsy.com/listing/230780505/crochet-wash-cloth-spa-cloth-cotton?ref=shop_home_active_2
You will need:
size H/8-5.00 mm crochet hook 
Cotton worsted yarn

Make 30 chain stitches (cs)
Yarn over. Skip first 2 cs 
Insert hook in the center of the 3rd chain from the hook.
Yarn over...
Draw through 3 loops on hook
(one half double crochet complete)
Repeat across to end of foundation chain.
You need to turn your work to start Row 2. 
Chain 2 (ch 2) and yarn over the hook (yo). 
Skipping the first stitch of the row directly below the turning chain, insert your hook in the next stitch. 

Button necklace to crochet this summer #etsycraftparty

 Do you have a lot of buttons sitting around? Here is an idea how to use them from Tonya (CityCrochet): crochet this cute necklace with colorful buttons. Perfect for a summer outfit!

This tutorial is a part of our virtual Etsy Craft Party 2016. See more on our blog!


So, here is how to make the button necklace. We will need a mercerized cotton thread, a toggle clasp, a crochet hook and about 30 buttons of different sizes and colors.

To make crocheting simple and to safe us some time we will start with beading all out buttons on a thread first. Once all our buttons are ganging there nicely we can start crocheting.

Crochet a simple foundation chain adding buttons with 1 or 1 and 1/2 inch. intervals. In case you would like to make your necklace longer you can add some more buttons or make a space between them larger. Mix and match hues of green and blue buttons and your necklace will looks unique and stylish.
TonyaUtkina shop
With 34" long necklace you can wear it either around your neck or your wrist. But of course, you can adjust the length to wear this necklaces on your waist instead of a belt or on your ankle.


happy necklaces
The necklace crocheting shouldn't take more than 15 minutes. When the thread is ready we will attach toggle clasp to it and our summer bright necklace is ready to wear. It's a perfect summer accessory and will make you look beautiful and special!

Lavender lemon bath salt #etsycraftparty

Here is a great recipe of lemon & lavender aromatic bath salt for you from Tanya (socksandmittens). It is easy to make and it is perfect for a lukewarm bath of a feet soak.


If you pack it nicely it can be also very good gift for a friend.
So, here is how to make this.

In a large bowl combine 1 cup of Epsom salt, 1 table spoon of dried lavender bath and 3 drops of lemon essential oil. Mix it thoroughly and transfer to a pretty, air tight glass jar. Label and decorate as desired.
To use, simply add it to your warm bath water. Enjoy!


Saturday, June 18, 2016

How to make a nautical knots bracelet #etsycraftparty

Today Katrin from katrinshine will show how to make a wonderful knotted bracelet nautical style. She choose a pale pink color to make hers but you can always make it in traditional white, red and blue nautical colors. 

Materials you need:
  • pliers
  • cord about 0.5-0.7m/20-30"
  • cord ends
  • 2 jump rings 5mm/0.2" diamete
  • lobster clasp
  • if it's possible, the chain-extension
  • ruler
  • scissors
So, lets begin. Take the cord and divide it into two halves. Then, from one half make out the knot shown in the figure below.
Pass the second cord besides the first one. Here's what you should have.
Tighten the knot.
Measure your wrist. Cut out this length from the the cord with knot wrapping the place before with scotch tape. You can put a drop of glue. Do not be afraid that the bracelet will be small - we are still going to add the lobster clasp and chain extention, at the end the length increases.

Attach cord ends to both ends of the bracelet.
At one end attach the lobster clasp, at another end - the chain-extension.

Your bracelet is ready! Happy crafting!


Tuesday, February 16, 2016

Free cross stitch pattern, Spring birds and flowers

Here is a wonderful spring birds and flowers stitching for you from Maria (LaMariaCha). If you love to cross stitch, it might be a great way to make it during last winter nights and turn it into something spectacular, like a tote or a purse.
https://drive.google.com/file/d/0B13Zc5w89rkJNFlTaVRvOFlhUkk/view
 This design has a very nice folklore feel. It will look great on contrast with black canvas cloth with its bright colors. Or stitch it on natural linen for the coming Easter decor.

You can download this free cross stitch pattern here or here

Maria is a cross stitch designer from Kursk, Russia. If you'd like to see more of her work, please visit her LaMariaCha shop on Etsy.

Thursday, October 29, 2015

How to make a felted ghost for Halloween

Some of us will most probably decorate our homes for Halloween. I would like to share an idea of a DIY project of making felted ghosts for Halloween.


We will need white and black felting wool, a glass to use as a form, soap, water and a piece of bubbled wrap paper.


On a piece of bubbled wrap paper put an empty glass upside down. Slowly start to cover it with white wool. It makes sense to water the surface of the glass beforehand so that our pieces of wool could stick to it. Once the glass is all covered with wool it's time to wet our wool with soapy water. It makes sense to water it slowly so that our wool doesn't fall off the glass and stays there covering it nicely. Once white wool is wet we can start making our ghost's "face".


With a piece of black wool make an eye and attach it to our white ghost. It's much fun to experiment with sized and eye position as our ghost's face expression will change dramatically depending on what shape and size ghost's eyes will be.

Once all the wool pieces are at place we can start the felting process. Carefully wrap bubbled paper around our glass and start rubbing it. Be gentle so that our wool doesn't fall off the glass. Once wool fibers become inseparable and our white form turns into a firm piece of felted wool it's time to rinse it.

To dry it well I let it sit on a glass overnight. Thus, the original form of the glass will be preserved and whet our ghost is nice and dry it will stay firm and round. I've attached a thread on top of it so that I could hang it anywhere in my room or outside. My little white ghost turned out to be not scary at all. But it's all in your own hands. Designing the ghosts face is the most creative part of the whole process!


Story By Tonya (CityCrochet)

Wednesday, October 28, 2015

Last minute Halloween projects from Russian Artists

There is just a little bit time left for decorating for Halloween. If you are hosting a party here is some ideas for a last minute crafts and food from our team members blogs:

Falling leaves decor tutorial from Alecia's (Artctida) blog:
http://arctida.blogspot.se/2012/11/diy-autumn-home-decor-falling-leaves.html
 
Black cat free cross stitch pattern from Vita's (DwarfsTreasure) blog:
http://silvercutedwarf.blogspot.com/2011/10/halloween-is-coming.html

Printable wine glass tags from Irina's (graphicland) blog (free image):
http://irinascutebox.blogspot.com/2011/09/halloween-printable-tags-for-wine.html


Appetizers ideas and recipes from Tanya's (socksandmittens) blog:
http://socksandmittens.blogspot.com/2014/10/halloween-party-food-ideas.html


There are so much more great project ideas you will find in our shops on Etsy. Happy Halloween!

https://www.etsy.com/listing/62541426/victorian-halloween-ephemera-digital
Victorian Halloween ephemera digital collage sheet by karisagraphic

https://www.etsy.com/listing/158370948/digital-download-abstract-ink-drawing
Digital download abstract ink drawing by AlPlo

https://www.etsy.com/listing/83349506/printable-victorian-halloween-gift-tags?ref=listing-shop-header-3
Printable Victorian Halloween gift tags digital collage sheet by graphicland

https://www.etsy.com/listing/197740664/halloween-digital-collage-sheet-15inch
Halloween digital collage sheet by MyMidnightMoon


Monday, October 6, 2014

Children crochet leg warmers free pattern Molika


The temperature is going down so it's time to get warm! Get your bulky wool yarn and crochet hook and you will make these pretty legwarmers over the weekend so your child's little legs could stay warmer this fall and winter.
https://www.etsy.com/shop/AACottonCreations?ref=shopsection_shophome_leftnav
This free pattern is courtesy of Adina from  А&А Cotton Creations. Check out her matching cowl pattern, too! 

Children crochet leg warmers free pattern Molika
Skill level: easy

FINISHED MEASUREMENTS:
8” x 11” (20 cm x 28cm) unstretched for 1 to 4 years old child
9” x 13” (23 cm x 33 cm) unstretched for 5 years old to pre-teen

MATERIALS:
·Loop&Threads Cozy Wool yarn. Super Bulky, Yardage/Meterage: 90 yds/82 m, ball weight:4.5 oz/127g.

·Lion Brand Wool-Ease Thick & Quick Yarn. Super Bulky, Yardage/ Meterage: 108 yds/98 m, ball weight: 6 oz /170 grams

- or any other blend of similar yardage yarn. You will need 1 skein for toddler size and a little more for children size.

Crochet hook  M/N – 9 mm or size to obtain correct gauge.

Buttons (optional), tape measure.

GAUGE
7 hdc x 6 row = 4” (10 cm) square.
Make sure to check your tension before starting to crochet. The width is more important to get right than the height. You can change hook size to bigger or smaller to get right tension.

ABBREVIATIONS:
This pattern in written in US terminology.
ch – chain,sl st – slip stitch, hdc – half double crochet, sc – single crochet.

NOTES:
The legwarmers are worked in rounds.

CROCHET LEG WARMERS:

For a child 1 to 4 years old:
Start: ch14, join with sl st in first ch to form a ring. (Make sure chain does not get twisted when you join.)Note: Check the circumference of the ring, it should be stretched out to 9”(22cm). If it’s bigger or smaller change the size of hook or crochet by a different size.
Rnd1-15: Ch2, hdc in all sts around, join with sl st to top of beg ch2 = 15 hdc.
Repeat rnd 15 if you want your legwarmers longer.
Fasten off. Finish off loose ends.

For 5 years old to pre-teen:
Start: ch16, join with sl st in first ch to form a ring. (Make sure chain does not get twisted when you join.)Note: Check the circumference of the ring, it should be stretched out to 10”(25cm). If it’s bigger or smaller change the size of hook or crochet by a different size.
Rnd1-18: Ch2, hdc in all sts around, join with sl st to top of beg ch2 = 17 hdc. Repeat rnd 16 if you want your legwarmers longer. Fasten off. Finish off loose ends.
 
Decorate your legwarmers with buttons or crochet flowers if you'd like or leave them as is. They are pretty either way!
 
Happy Crocheting!
Related Posts Plugin for WordPress, Blogger...