Social Icons

Pages

Showing posts with label paper craft. Show all posts

Sunday, March 3, 2013

Interview with a Star, Tatiana from Tatiana's Tienda shop


Many of our team members are multi talented and they have such interesting stories behind their avatars. We'd like to introduce one of our new members today. You already had a chance to make a new Easter basket using Tatiana's easy to follow tutorial and now you can find out more about her. Please welcome, Tatiana from Tatiana's Tienda shop and this is her story.


My name is Tatiana. I was born in a small Siberian city called Irkutsk. I graduated from university with a degree in civil engineering and management in economics. If you'd have told me nearly two years ago that I would open craft store in the US and that I'd be crocheting and creating crafts, I would have though that you were insane! It just wasn't a future that I had in mind.


At the time, I was working with a construction company and dealing with projects and numbers, while at the same time I was studying for my second degree and teaching fitness in the evening. Everything was so overwhelming, I didn’t enjoy my life and one day I was fed up with it. I can remember this day… I was sitting in a lonely office, working on a boring drawing of a building riddled with numbers. I opened up a web page and started searching for flights. At the time, it didn't matter where I'd go…The most important part was getting FAR AWAY from the craziness that was my life! That same day I bought a one way ticket to Bangkok and I was infinitely happy with the decision that I made. I didn’t know what to expect or where I'd go afterwards, but I definitely decided that I didn't want to live that crazy life anymore.
 I passed my final exam in January, got a diploma in civil engineering, quit my job, and moved all my stuff into a garage as I was off to Thailand. I remember saying to my family and friends, “I’m starting a journey towards a 'real' life, a life that I deserve and want to live, and a life that society doesn't dictate for you…A life that you want to live and share with others!” 
From there I traveled for about 10 months and it was the most amazing months of my life! I went to meditation courses, volunteered in Laos, worked in China with kids… 
 But the most important thing – I’ve met an amazing person, my soul mate, a person who understands me without words on the way to “my new life”.

We traveled in South East Asia together, lived through the craziness of China… And then one day he asked me, "Do you want to visit the US?" Well, I had never been a big fan of this country but I realize now it was all due to the media. Russia and USA had never been big friends and I also had such restricted visions about the country before… But after traveling in so many countries,  I realized that political views of a government don’t always have anything common with the people who live there. So I agreed to come with him. Right now I amazed with this country and really enjoy living here.

When I flew to the US I didn’t know what I was going to do or where I'd look for work. One day my boyfriend’s sister was knitting a scarf. And I remembered how I love doing this in childhood, but when I grow up I totally forgot about it because didn’t have time for it. The very next day I made a hat for my boyfriend. Afterwards, we came up with the idea to sell items such as this on Etsy. 
 I made different goods for special holidays like Christmas and Valentine’s Day. I later created candy bouquets and wicker baskets made from newspaper.
I really enjoy the things that I create, because I know that it will make my buyers happier and richer inside, will put a smile on their face and maybe even change the world for the better!

And as you can see in both 'my story' and the level of detail and pride I take in all the goods I make, I put my heart and soul into this little boutique shop. This is how I support myself! I appreciate all my customers for all sales I receive and will go out of my way to make you happy with your order!!
I realize 'my story' is much more detailed than most you'll come across, but just wanted show how one day can change your entire life! Your life is in your hands and you are the creator of your destiny. Don’t be afraid of changes. It may seem too scary to make changes right now… but feel it in your heart that changes are for the good – so never hesitate to take the first steps!

Story by Tatiana (Tatiana's Tienda)


Tuesday, February 19, 2013

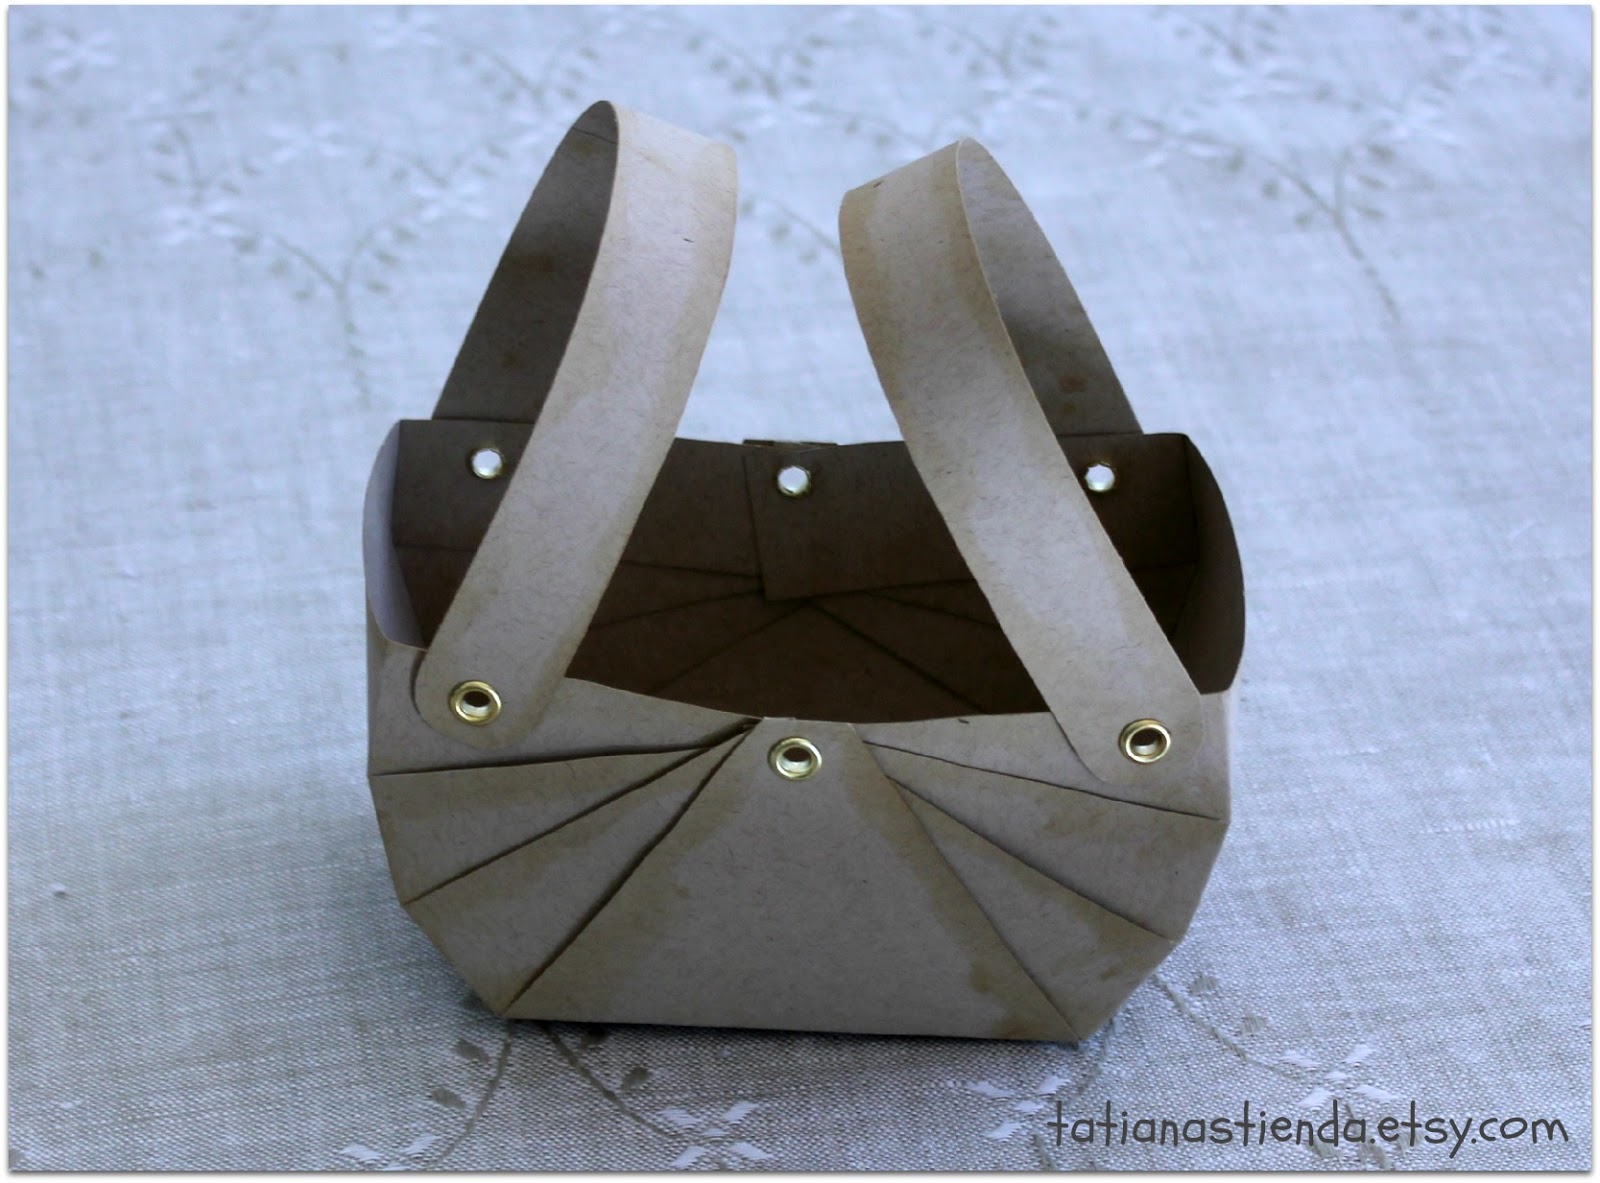
How to make an Easter basket for your spring treats


Spring is near and so is Easter. Get ready for the sweetest spring holiday by decorating your home! We love to decorate with handmade things so today Tatiana from Tatiana's Tienda shop on Etsy will show us how to make a cute little basket for your sweets or goodies.

To make this basket you'll need:

Cardstock or heavy weight paper 11"x 8.5"
Punch and copper eyelets size 5mm
Felt, ribbon,
Scrapbook embellishments: butterflies and flowers
Scissors, glue, ruler, pencil

How-to:

Take a piece of cardstock and divide it into 9 equal squares. Take the middle square and divide it in half. Draw the lines as shown on photo.
Make cuts with the scissors, about 3/4"  from both sides. This is your basket handles.
Divide the squares into three sections and draw the lines. Cut and fold them. 


If you'd like to create an old edges effect use a brewed tea bag:
 Fold strips one by one and then fold the front part. Use a punch to connect the parts together.
Decorate with eyelets.
 Attach the handles to the sides.
 Our basket is almost ready, but we still need to decorate it. 
Tanya used a pretty nylon ribbon and felt to decorate the inside perimeter of her basket. She also glued a felt semi-circle on the front.


Make your basket one of a kind and use your imagination to decorate it as you pleased - have fun!


Tutorial by Tatiana (Tatiana's Tienda)

Monday, April 30, 2012

A card for your mother

Today Alisa from GraphicMarket shop on Etsy is sharing great story and ideas for making a greeting card.

We all have our own little traditions, the way we do things – my personal little obsession is card making. Christmas Cards, greeting cards for birthdays, thank-you cards and so on. Of course we never have time for such things, but the process can be so relaxing that you can make cards for half a year ahead just in one go.

Lot’s of my friends told me that they are waiting every year for my Christmas card to arrive. It was so sweet when I realized that people are keeping my cards, they don’t throw them away! It makes my hobby very special.

Here you can see my latest creations that will suit perfectly mother’s day theme.

For this project you will need:
 - Thick cardboard (I used watercolor paper)
 - Ink (or a felt pen)
 - Ribbons (preferably 2 shades and 2 different width)
 - Glue (any paper glue will do, but I prefer to use double sided tape, it creates less mess)
 - Printable digital paper or digital collage sheet – that’s my favorite! This magic stuff turns any card into a masterpiece! Try to find 2 matching patterned papers, just like I did – polka dot and flower pattern – they work well together) I used a usual printer to print the patterns on A4 format thick paper.

That's probably all we will need. :)

For your cards you can try the ideas on the photos. At fist glance it seems you really need to have some drawing skills, but look again and you’ll notice that the best cards that I made are dead simple!

For example little cute dress on the drying line – easy to make and it’s such a cutie! Or hearts in the shapes of balloons – that’s another great idea for you – be creative and be confident – you’ll get it right)

Tips:
  • Simplicity is the key! Keep it simple, keep it fresh and don’t clutter all you scrap booking elements on one card. Even if you put just one shape out of scrap booking paper (a heart for example) and write a name of the recipient underneath it will look stylish and elegant
  • Have a color scheme. 1-2 colors that work together will look better than a rainbow of all your favorite colors together
  • Add personal touches – even if it’s just a hand written message or doodles around the edge – it will help your card to stand out and will show the recipient your true affection.
  • Ribbons and bows are simple but very effective tool in card making - they are cute and they add 3D to your card. (The easy way to attach the ribbon, when you’re using it horizontally, is to make a little cut at the side of the card, thread the ribbon through the hole and glue both ends of the ribbon inside the card – you’ll get clean ends of the ribbon and no glue on the front of the postcard) 
You can find lot’s of cute scrapbooking materials in my shop (GraphicMarket) so next time you are thinking about card making or just need a background for your website, please stop by.

I highly recommend card making as a hobby. Scrapbook collages made it so simple and enjoyable. Just try to make a card yourself next time you’re invited for a birthday party or mother’s day!

Lot’s of my friends told me that they are waiting every year for my Christmas card to arrive , it was so sweet when I realised that people are keeping my cards, they don’t through them away – it makes my hobby very special.

Be creative and have fun!

With love,
Alisa (GraphicMarket)

Saturday, November 19, 2011

Holiday gift tags giveaway results

We are happy to announce the winner of our holiday gift tags giveaway.

Comment #4 by JC was chosen as the winner.

The 2 sets of tags are going to be packed in a next couple of days and sent to the winner's address!

Tanya (zarabezbazara) will contact the winner to verify the shipping address.

Congratulations and thank you for participation, everyone!

Sunday, October 23, 2011

FREE digital collage sheet with printable Halloween wine glass tags

Halloween is coming soon! It's time for fun and great parties. Bring some cute final decoration touch for your party. Today, Irina from GraphicLand shop is sharing adorable wine glass printable tags that you can print at home printer.

Free printable Halloween tags digital collage sheet
If you are going to have a party in your home, you'll definitely need to decorate a table with decors that fit the theme of Halloween. So, these glass tags... or paper charms... are especially perfect for standing dinner where people moving around socializing and can forget where they put their glasses. Having the tags will help them do not loose their wine glasses :)

You need just print them and cut off. I recommend to print the tags on laser printer on 100 lb card stock. It's 8.5x11inch digital file which is standard letter size with resolution 300 dpi.

Free printable Halloween tags digital collage sheetThe free digital collage sheet is available there. If there is something wrong with the link, please leave a comment and we'll fix it. And don't forget to come back to download it :)

Please, keep in mind, that the collage is for personal use only. It's not for sale in printed or digital form.

Enjoy and Happy Halloween!

Monday, September 26, 2011

Halloween free graphic

This lovely vintage image is perfect to use in your greeting card or a scrap book Halloween project. Katrin at karissagraphic is sharing this with us today and there is much more in her Etsy shop!

 
We'd be happy to hear about your creative ideas on using this image for your crafts*. Please let us know what you think!

Happy crafting!

*This image is for personal use only.
Related Posts Plugin for WordPress, Blogger...