


This great heart shaped brooch is fun to make with easy to follow instructions and colorful photographs by Tanya (soroka)

To make a heart like this you'll need:
natural undyed wool batt
red wool batt
felt needle #46, #48
foam sponge or a special brush for felting
Pin back
natural undyed wool batt
red wool batt
felt needle #46, #48
foam sponge or a special brush for felting
Pin back

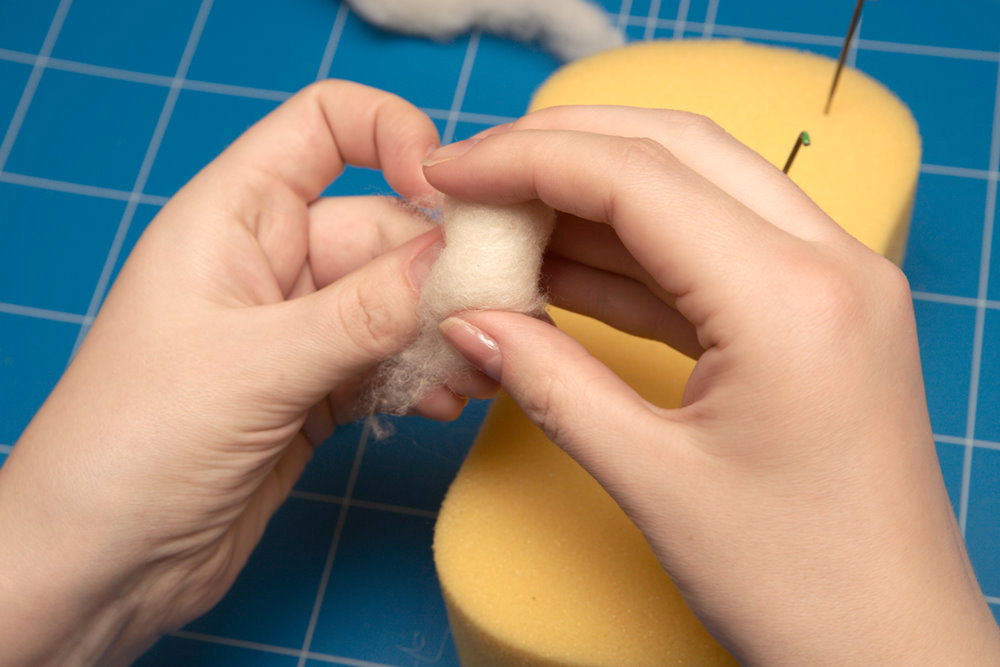
Make a middle part of your heart:

Take a fist size amount of natural undyed wool and form a triangle. Poke through the wool evenly with needle #46. The special notches on the tip of the needle will engage the fibers and push them deep into the product. Make sure that needle passed through the whole piece of wool. Use the foam sponge as a working surface to protect your fingers from the wounds. 

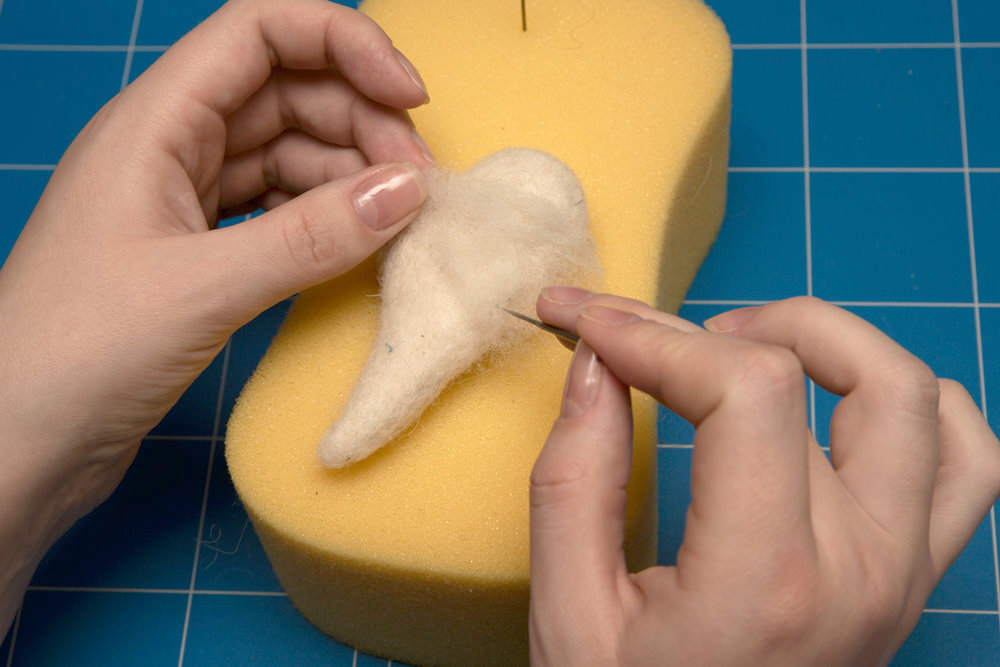
Make a top of your heart:
Take 2 small pieces of undyed wool, about 1/4 of initial volume and roll them into beads. Leave the end of each bead unfelted:
Attach one bead with unfelted end to the left side of your triangle. Gently needle bead to the base to connect them. Repeat with the right side.
When the whole piece is holding together well and resembling a heart needle all over the piece to secure the fibers on the surface. 

Continue working all over the heart shaped base until it will reduced in size and become firm. At this point you will not be able to stick a needle in it anymore.
Take a look at your heart. It should be firm with smooth surface. If you see some small unperfections simply add some more wool to the spot and needle it to the base.
Cover the base evenly with thick layer (about 1/2") of red wool and slightly needle it with needle #48.

When all fiber is attached start needle felt it all over until the surface of the heart is evenly coated and very smooth. Do not needle through your piece. Add some more of red wool fiber if needed. Continue needle felt until you are happy with the results.

Your heart is ready. If you like it like it is it's time to attach pin back and enjoy your new brooch.

If you'd like to proceed and try a wet felting technique you can wet your heart with warm water and soap and gently rub with your fingers. At this point you can also shape it some more. Rinse it with clean water, gently squeeze the excess of liquid and let it dry overnight or until dry.

If you like you can embellish your new heart with embroidery, beads or bows. Sew the brooch pin on the back and enjoy your new brooch!
If you like this brooch but not into felting you can purchase the one like this from Tanya's shop! Please visit her shop today to see the wonderful selection of her felted items!
Tutorial by Tanya (soroka)
Translated by Tanya (Socksandmittens)

9 comments:
Great tutorial! Thank you for sharing!
Thank you for this detailed tutorial. I want to try to make one as well.
great tutorial! The heart looks fantastic!
I love this tutorial. I finally understood how to make this brooch! i just have to try to make it!
Thank you so much!Beautiful brooch!
Great tutorial! Thanks :)
This is great! I didn't know felting used special needles nor did I know the technique for felting. Your tutorial has given me insight into how felting works, thanks!
Victoria
OsoVictoria.com
Wow - this really is a very nice step-by-step tutorial! Thanks a lot for all the time and effort you put into making it!
Nice tutorial.
Well done two Tanyas. I wish I have seen it before the Valentines day. Oh well, better later then never. Thank you
Post a Comment