Social Icons

Pages

Showing posts with label dariami. Show all posts

Monday, October 17, 2011

Polymer Clay "Chevron Style" beads (Star beads)

Polymer clay beads are fun to make and they look great. Make these chevron style beads with Daria (Dariami) and get the compliments on your new necklace or earrings!

Materials and Tools:
·         Three contrasting colors of polymer clay (e.g. red, blue, white)
·         Plastic wrap
·         Plastic card (something like credit card)
·         Pasta machine
·         Knife (tissue blade)

1.      Condition the clay.
2.      Roll the clay through the pasta machine: red and blue on 2mm setting, blue – on 1 mm setting. Make 3 white, 2 red, and 1 blue sheets.
3.      Layer the sheets in order: white, red, white, red, white, blue. Cut the edges so you have a nice rectangle.
4.      Cover the block with plastic wrap and cut it with plastic card onto equal segments. Notice, when you cut with plastic card, the colors are shifting.
 5.      Roll the log out with white polymer clay. Place striped pieces to the white roll blue sides out as shown.

6.      Make the cane thinner by pressing it on center and to the ends. Try to press all over the cane equally. The cane will become longer and thinner. Do so until you reach the necessary size.
 7.      Cut the cane onto equal pieces. Shave off some clay at an acute angle. Do this all the way around the base of the bead. Repeat that with the other end.
 8.      Using your fingers, shape the beads.
 Now use your imagination to create one of a kind piece!

By Daria Dariami and Albina Arounbeads

Monday, September 12, 2011

DIY tutorial pandora style polymer clay stripped beads

Today, Daria from Dariami shop on Etsy is sharing a great DIY tutorial how to make pandora style stripped beads of polymer clay.
https://www.etsy.com/shop/Dariami
We need several colors of polymer clay for this project, white, brown, orange and beige.


Knead the clay and mix it in different proportions to get several different colors.


Roll the clay out to get layers with different width. You can use special equipment (pasta machine or plastic roller) or use glass bottle or hair spray bottle. It’s better to do this on a glass or ceramic surface.


Put the layers one on top of another and cut to get even edge. We got layered cube now.


Cut one side of the cube with blade to get the 2-3 mm thick slice.


Take neutral color clay for a bead core. Roll a cane a little bit longer than striped slice. We need to do this because the edges will be deformed when we make the cane thinner, so we can cut the edges off.


Cover the core with slices and smooth the slice joints down.


Now, we need to make the cane thinner. You need to press it on center and than move to the ends. Try to press all over the cane equally. The cane will become longer and thinner.


Cut the cane onto equal pieces.


Squeeze the edges of the cylinder and close the core.


Roll the clay by hands to get a ball. To avoid pattern distortion, it’s better to do it both directions equally, clockwise and opposite direction.


Make a hole using a toothpick.


Enlarge the hole with big knitting needle. To make the hole look better use eyelets. Get them on the knitting needle and press into the clay.


Bake the beads according to the instruction on the clay package. Be careful and handle beads with care, they are very hot! Let them cool, then polish and apply special polymer clay finish. Do not substitute with nail polish or acrylic finish!


Your beads are ready! You can use them for your jewelry projects now. Daria used rubber cord and metal findings to make this necklace:


Enjoy!

Friday, September 9, 2011

Interview with a Star - Daria (Dariami)

We'd like to introduce our team mate Daria who runs Dariami shop on Etsy.

- Please tell us a little bit about yourself
My name is Daria and I live in Kiev, Ukraine with my husband and little daughter. I have a PhD in molecular biology and work as a scientific researcher. Currently I’m on maternity leave so I’m able to dedicate more time to jewelry making which now is becoming my additional source of income. Together with my friend I have organized master classes with guest artists teaching and also developed several classes myself.

- How long have you been creating? How did your journey in art and creativity begin?
I inherited my passion for crafts from my family and I hope that I’ll be able to transmit it to my daughter. Both my grandmothers sewed a lot, my grandfather is a wood craft teacher, my mother knits and my younger brother is a professional ceramics artist.

I created things as long as I can remember myself and learned the basics of sewing and needle work from my grandmothers. My mother knits very well and has taught me crocheting and knitting, but I’ve realized it’s not my passion. By the way, all crocheted items in my shop are crocheted by my mother. I have come up with all designs and then asked her to make crocheted lace that I then transformed to jewelry.

I’ve graduated from Children's Fine Arts School and also attended violin classes at a music school for 6 years, which I think was enough for me to have some background in music.

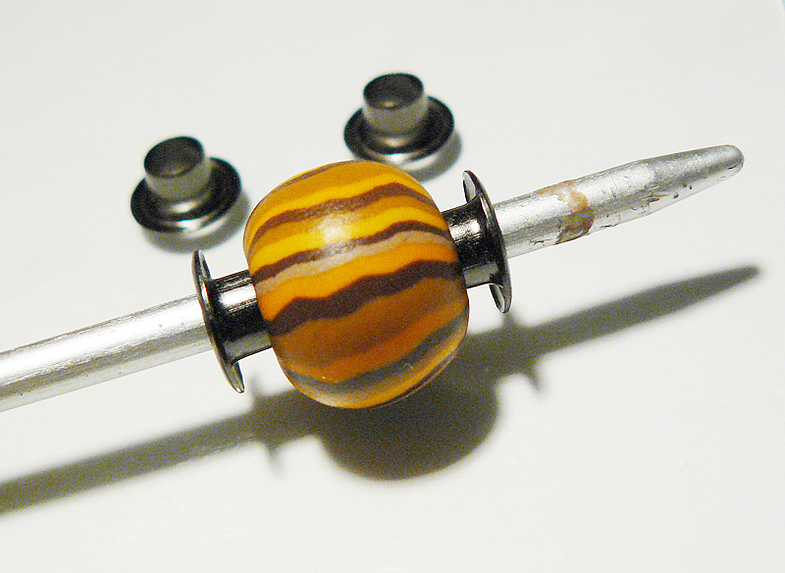
I liked beading since I was a teenager. I still don’t understand how I have managed to learn it because there was no opportunity to buy seed beads during that time in Ukraine. When I read in books that somewhere it was possible to buy beads by weight it was like another Universe has opened up for me. However, the Internet Era has come and we have much fewer obstacles to prevent us from learning new techniques, from finding unique supplies and buying whatever we need for a project. One day I discovered the polymer community on the Internet and from that moment polymer clay has became my favorite medium.
https://www.etsy.com/listing/170886813/glass-bottle-necklace-heart-collection?ref=shop_home_active_69

- How would you describe your style? Have any other artists etc influenced your style?
It’s hard to find a proper description for my style because I keep trying new techniques in polymer clay in order to achieve an interesting and fresh look. I like simple designs without complicated embellishments but try to add some spice to them. I look at other artist’s works and note any interesting details like unusual color combinations or new materials and then I use this knowledge to create something new and different. That’s how inspiration should work in my opinion.

- What inspires you and what does the day in your studio look like?
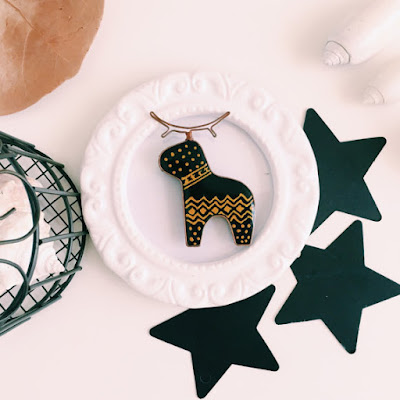
My inspiration comes mostly from nature. My family likes traveling a lot, we like to hike and every summer and spring we spend at least several days in the mountains or at the sea shore. The second source of inspiration includes folk ornaments, ethnic jewelry, trade beads. I visit all kinds of museums when I travel, and buy books, I also find interesting sites on the Internet.

https://www.etsy.com/listing/175267228/deer-brooch?ref=shop_home_active_59
My home is my studio and my “day” actually begins in the evening when my daughter goes to sleep. Then I have several hours to spend on making my handmade items, so almost everything that I create I create at night.
https://www.etsy.com/listing/195076932/adjustable-ring-turquoise-seashell?ref=shop_home_active_70

- Do you have a favorite item you have made?
It’s hard to name only one and my preferences change every time. Today I like my Boho collection the most.

- Do you use any special techniques or tools?
My home is stuffed with different kinds of materials and tools: pasta machine, cutters, textures, paints and inks and so on. I also find unusual applications for surrounding household objects: buttons, kid’s toys, kitchen utensils.

I have a feeling that sometimes sellers in shops where I buy tools think I’m crazy. I might be crazy alright but my family is already used to it. :)

https://www.etsy.com/listing/170886813/glass-bottle-necklace-heart-collection?ref=shop_home_active_69


Related Posts Plugin for WordPress, Blogger...