Social Icons

Pages

Showing posts with label beaded jewelry. Show all posts

Friday, January 6, 2012

Interview with a Star, Oksana Piven

Everyone is welcome in Oksana Piven's beautiful jewelry shop. You can find one of a kind handmade jewelry here made from polymer clay, beads, wire and so much more. Oksana is putting her heart and soul in every creation and she believes that people who wear it will be really happy!
Please tell us a little bit about yourself

My name is Oksana and I was born and raised in Ukraine. I have a husband and a 16-year-old daughter. Another VIP in our family is our cat!

I have a PhD in molecular genetics and I work as a senior scientific researcher at the Institute of Molecular Biology and Genetics.

- How long have you been creating?
As a child, I was enjoying my art classes at the Children's Fine Arts School. I was creating things in different styles and materials. My parents supported my creative explorations and interests in crocheting, knitting, painting and other types of crafts. They kept all paintings made by me at the child's age!

When I was a teenager I discovered macramé. This technique was new for me so I took some classes and filled our home with the variety of new panels and planters.
My current passion – jewelry making – started a few years ago. 

I'm thankful to the Internet and my friend who introduced me to the polymer and seed beads community on the Internet. At first I tried myself in seed beads and faceted beads techniques – I beaded beads and created necklaces with them. I enjoyed doing it and the process fascinated me. 
 When I discovered polymer clay and the possibilities of this material I liked it very much. I try new techniques all the time, for example, I try to use polymer clay and other materials together.
 

- What items do you carry in your shop?
In my shop you can find statement necklaces and lovely pendants to wear every day.  I work with a variety of techniques. I like use the texture on clay technique in my jewelry, as well as hand-sculpting and molding techniques.

I like to create jewelry from natural materials or metal imitation techniques. I am fascinated with the process of jewelry making. And beauty is a very important criterion for me. Jewelry should be beautiful and harmonious, and certainly interesting! I am sure that the value of handmade is in the originality and uniqueness and I try to show it in my works.
 - What inspires you and what does the day in your studio look like?

My inspiration comes mostly from nature. I love to use flowers or leaves as ornaments. Also I like folk ornaments, ethnic jewelry and trade beads. I collect pictures of Ukrainian jewelry, folk and modern, and I enjoy discovering it. In my creations I try to mix the traditional folk style and new materials.
 - Do you use any special techniques or tools?
Of course, I use different kinds of materials and tools: pasta machine, cutters, textures, paints and inks and so on. Moreover, sometimes I use the spices, salt, brushes, leaves, pieces of tree bark - anything I find useful.

Friday, October 21, 2011

Interview with a Star - Ira from TomBjornDesigns

 If you ever see this shop you will always want to come back. They have the loveliest necklaces and cute crochet rings which will make you feel so cozy. There is so much more there! Ira, the owner of TomBjornDesigns is telling us about her shop and her inspirations. It is especially nice when you know that today is Ira's birthday!

So happy birthday, Ira! We wish you all the best and may your all wishes come true!

Please tell us a little bit about yourself.
I am a Russian/ Israeli girl living in Sweden. (and I am turning 30 today, so I am not sure if "girl" still applies to me :))

And I think you can see it in my items - some are inspired by Mediterranean treasures, some by cold Northern fjords, so by my memories from the Soviet Union.
I live in a small apartment, which I am sharing with the man of my dreams and my business. And my beads take most of the space in the apartment.

How long have you been creating?
Since forever. Sometimes I think I was sitting in my mom's belly with a crocheting hook and a handful of beads... or buttons :)

What would you say makes your shop unique?
Probably the mix of old and new. I am inspired from vintage jewelry, but I am trying to put it into new context.
On top of my handmade items I am selling vintage beauties that I happened to find. Nothing makes me more happy than seeing it being shipped to it's new home.

What is the most important about your work?
I am trying to make happy items, and I hope that my customers feel it. Also, I mix the colors and materials in order to give my necklaces a flirty and unusual look.
And the last but not the least, I love my customers. I am trying to provide the best customer service possible, and hope they feel it!

What inspires you and what is the day in your studio look like?
Everything inspires me! Nature, vintage shops, my dreams, beautiful handwriting, my grandmother's photographs, and of course, love of my life, Stockholm.

Your versatile necklace / bracelets line is so popular. What's the key?
Well, first of all it is their versatility that makes them so appealing. They can be worn in so many different ways and my customers like to change their look every day. Another things that makes them my best-seller is probably the colors... and the love I invest in carefully picking the color palettes.

Do you take custom orders?
Yes, I love them. I love to follow the imagination of my customer and to make quite unexpected things for me.
This necklace was inspired by a customer:

Where would you like to go with your business?
I would love to develop it further and to brand it better. I dream of selling it to shops and galleries on a regular basis (so far I had only several orders from various galleries, but I work on it!)

Monday, October 17, 2011

Polymer Clay "Chevron Style" beads (Star beads)

Polymer clay beads are fun to make and they look great. Make these chevron style beads with Daria (Dariami) and get the compliments on your new necklace or earrings!

Materials and Tools:
·         Three contrasting colors of polymer clay (e.g. red, blue, white)
·         Plastic wrap
·         Plastic card (something like credit card)
·         Pasta machine
·         Knife (tissue blade)

1.      Condition the clay.
2.      Roll the clay through the pasta machine: red and blue on 2mm setting, blue – on 1 mm setting. Make 3 white, 2 red, and 1 blue sheets.
3.      Layer the sheets in order: white, red, white, red, white, blue. Cut the edges so you have a nice rectangle.
4.      Cover the block with plastic wrap and cut it with plastic card onto equal segments. Notice, when you cut with plastic card, the colors are shifting.
 5.      Roll the log out with white polymer clay. Place striped pieces to the white roll blue sides out as shown.

6.      Make the cane thinner by pressing it on center and to the ends. Try to press all over the cane equally. The cane will become longer and thinner. Do so until you reach the necessary size.
 7.      Cut the cane onto equal pieces. Shave off some clay at an acute angle. Do this all the way around the base of the bead. Repeat that with the other end.
 8.      Using your fingers, shape the beads.
 Now use your imagination to create one of a kind piece!

By Daria Dariami and Albina Arounbeads

Monday, October 10, 2011

Halloween earrings tutorial with crochet beads

Get in Halloween spirit with this pretty and stylish earrings! You can make them yourself in no time with this easy to follow tutorial from Katrin Katrinshine!
 You will need:
2 black earrings hooks, 
2 black round head pins, 
4 black beads, 
2 pre-made orange crochet beads*,
Wire cutters,
Round nose pliers

* We are not providing a pattern to crochet beads in this tutorial but it is easy to find one online.
  
1. Thread one black bead on the pin, then thread the crochet orange one and the second black bead.


2. If your pin is too long then cut it about 1 cm/0.4" from the second bead and coil the wire end using the round nose pliers. Make 1 or 2 coils.


 3. Attach the ear hook. Your first earring is ready.

 Repeat for the second earring steps 1through 3.

  Your new earrings are ready! Enjoy!

Monday, September 12, 2011

DIY tutorial pandora style polymer clay stripped beads

Today, Daria from Dariami shop on Etsy is sharing a great DIY tutorial how to make pandora style stripped beads of polymer clay.
https://www.etsy.com/shop/Dariami
We need several colors of polymer clay for this project, white, brown, orange and beige.


Knead the clay and mix it in different proportions to get several different colors.


Roll the clay out to get layers with different width. You can use special equipment (pasta machine or plastic roller) or use glass bottle or hair spray bottle. It’s better to do this on a glass or ceramic surface.


Put the layers one on top of another and cut to get even edge. We got layered cube now.


Cut one side of the cube with blade to get the 2-3 mm thick slice.


Take neutral color clay for a bead core. Roll a cane a little bit longer than striped slice. We need to do this because the edges will be deformed when we make the cane thinner, so we can cut the edges off.


Cover the core with slices and smooth the slice joints down.


Now, we need to make the cane thinner. You need to press it on center and than move to the ends. Try to press all over the cane equally. The cane will become longer and thinner.


Cut the cane onto equal pieces.


Squeeze the edges of the cylinder and close the core.


Roll the clay by hands to get a ball. To avoid pattern distortion, it’s better to do it both directions equally, clockwise and opposite direction.


Make a hole using a toothpick.


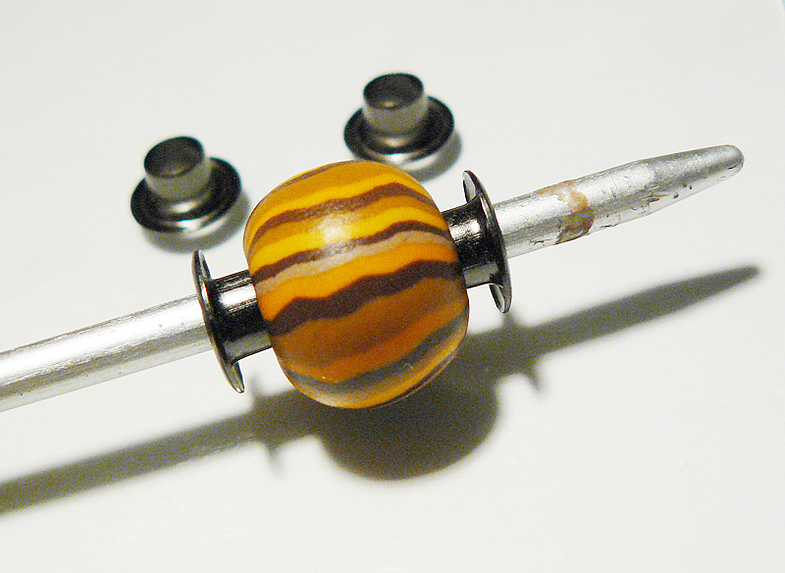
Enlarge the hole with big knitting needle. To make the hole look better use eyelets. Get them on the knitting needle and press into the clay.


Bake the beads according to the instruction on the clay package. Be careful and handle beads with care, they are very hot! Let them cool, then polish and apply special polymer clay finish. Do not substitute with nail polish or acrylic finish!


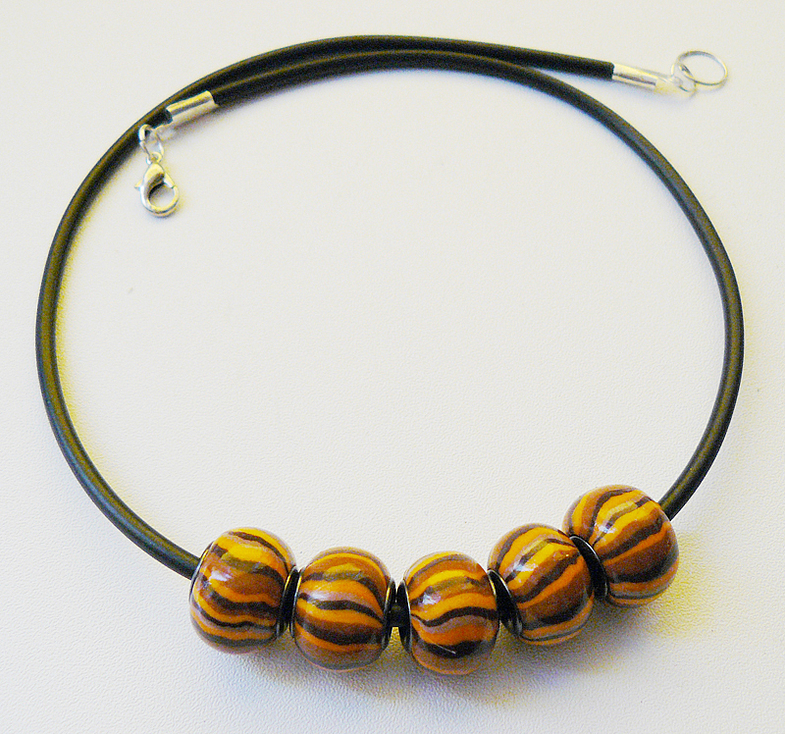
Your beads are ready! You can use them for your jewelry projects now. Daria used rubber cord and metal findings to make this necklace:


Enjoy!
Related Posts Plugin for WordPress, Blogger...