


Knead the clay and mix it in different proportions to get several different colors.

Roll the clay out to get layers with different width. You can use special equipment (pasta machine or plastic roller) or use glass bottle or hair spray bottle. It’s better to do this on a glass or ceramic surface.

Put the layers one on top of another and cut to get even edge. We got layered cube now.

Cut one side of the cube with blade to get the 2-3 mm thick slice.

Take neutral color clay for a bead core. Roll a cane a little bit longer than striped slice. We need to do this because the edges will be deformed when we make the cane thinner, so we can cut the edges off.

Cover the core with slices and smooth the slice joints down.

Now, we need to make the cane thinner. You need to press it on center and than move to the ends. Try to press all over the cane equally. The cane will become longer and thinner.

Cut the cane onto equal pieces.

Squeeze the edges of the cylinder and close the core.

Roll the clay by hands to get a ball. To avoid pattern distortion, it’s better to do it both directions equally, clockwise and opposite direction.

Make a hole using a toothpick.

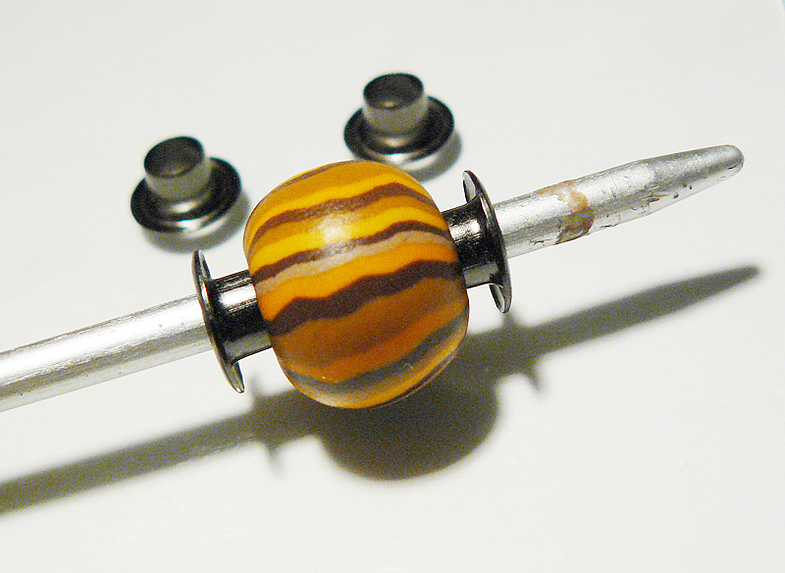
Enlarge the hole with big knitting needle. To make the hole look better use eyelets. Get them on the knitting needle and press into the clay.
Bake the beads according to the instruction on the clay package. Be careful and handle beads with care, they are very hot! Let them cool, then polish and apply special polymer clay finish. Do not substitute with nail polish or acrylic finish!

Your beads are ready! You can use them for your jewelry projects now. Daria used rubber cord and metal findings to make this necklace:

Enjoy!

31 comments:
Wow!So interesting! Thank you very much for sharing!
Love, love, love your tutorial! Can not wait for the store to open to get some clay and get started.
WOW! awesome!
amazing!!!! I would definitely try to do it!!
That is so cool! love how the beads turned out!
Thanks for the clear step by step tutorial. Will try to make buttons using this technique.
Awesome tutorial! Thank you so much for sharing!
So wonderful tutorial! Thank you
Amazing tutorial! So cute beads and so easy to make them!
Thank you for sharing!
Very, very interesting, Thanks!
Very, very interesting, Thanks!
Great tutorial!
Thank you!
Glad you like it!
To be continued!
Very useful!
Very easy tutorial. Thank you for sharing :)
Thanks! Very interesting! I like it!
so easy to follow!
now I want to do it myself!
Very interesting! Thank you!
Great tutorial!! Thanks a lot!!
Beautiful beads! Thank you for nice and clear tutorial!
What a great article! I definitely have to try making this bead, looks like it is lots of fun :)
The eyelet idea is brilliant!
Thank you! I would not have thought to use eyelets.
tremendous tutorial. thank you.
Thank you for the tutorial. I never thought to use the knitting needle.
How nice of you to share such a popular technique for free. As Polymer Clay gets more popular less people will probably offer free quality tutorials for the opportunity to sell them to make money-which isn't a bad thing- unless like me, you don't have the means to buy many of them. I would like to share a couple useful tips, though that I learned through trial and error. I found that if I didn't pop out the eyelets after baking the beads and then glue them back in with weld-a bond, or a super glue, that when I tried to pull the beads over the metal on a pandora cord, the eyelets would pop out. Also this keeps you from accidentally scratching up the eyelet if you want to sand your beads, and keeps the gloss(i used future -and also use it to wax my floors) off the finding. Simply sand and buff the cooked beads before you glue the eyelet back in~and voila~ you have a nice secured pandora like shiny-smooth bead!
Hi. Great tute. I have been making Pandora style beads for about a year. I also use eyelets. I sand, polish, and then replace the eyelets by gluing them in. One of the problems is I am having quite a hard time finding an appropriately sized hole in the eyelets. They don't work for all sizes of the metal Pandora cords. I have searched the web, and all of our local craft stores, still not as large as I need to fit. Any help from Someone would be sooo appreciated. All I see on the web is 925 silver. I just want the regular old eyelets. Best of luck in your endeavors. Thanks again for sharing. Rozz Hopkins
I am wondering what the dimensions (length and width) you cut your layered cube to.
Hi,
Its a awesome tutorial. loved it.. :) i didnt find the eyelets in my local craft store. Could you please share the size of the eyelets you used and what cord is used for the necklace?
Thank you so much for sharing. :)
Cool! I love Pandora style beads! What size knitting needle and eyelets did you use?
Post a Comment