Social Icons

Pages

Showing posts with label scrapbook. Show all posts

Tuesday, February 19, 2013

How to make an Easter basket for your spring treats


Spring is near and so is Easter. Get ready for the sweetest spring holiday by decorating your home! We love to decorate with handmade things so today Tatiana from Tatiana's Tienda shop on Etsy will show us how to make a cute little basket for your sweets or goodies.

To make this basket you'll need:

Cardstock or heavy weight paper 11"x 8.5"
Punch and copper eyelets size 5mm
Felt, ribbon,
Scrapbook embellishments: butterflies and flowers
Scissors, glue, ruler, pencil

How-to:

Take a piece of cardstock and divide it into 9 equal squares. Take the middle square and divide it in half. Draw the lines as shown on photo.
Make cuts with the scissors, about 3/4"  from both sides. This is your basket handles.
Divide the squares into three sections and draw the lines. Cut and fold them. 


If you'd like to create an old edges effect use a brewed tea bag:
 Fold strips one by one and then fold the front part. Use a punch to connect the parts together.
Decorate with eyelets.
 Attach the handles to the sides.
 Our basket is almost ready, but we still need to decorate it. 
Tanya used a pretty nylon ribbon and felt to decorate the inside perimeter of her basket. She also glued a felt semi-circle on the front.


Make your basket one of a kind and use your imagination to decorate it as you pleased - have fun!


Tutorial by Tatiana (Tatiana's Tienda)

Monday, April 30, 2012

A card for your mother

Today Alisa from GraphicMarket shop on Etsy is sharing great story and ideas for making a greeting card.

We all have our own little traditions, the way we do things – my personal little obsession is card making. Christmas Cards, greeting cards for birthdays, thank-you cards and so on. Of course we never have time for such things, but the process can be so relaxing that you can make cards for half a year ahead just in one go.

Lot’s of my friends told me that they are waiting every year for my Christmas card to arrive. It was so sweet when I realized that people are keeping my cards, they don’t throw them away! It makes my hobby very special.

Here you can see my latest creations that will suit perfectly mother’s day theme.

For this project you will need:
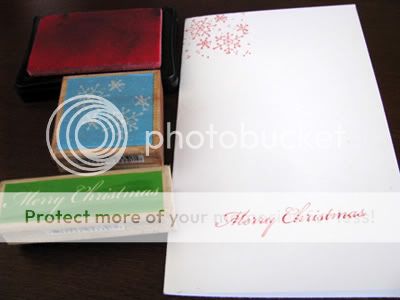
 - Thick cardboard (I used watercolor paper)
 - Ink (or a felt pen)
 - Ribbons (preferably 2 shades and 2 different width)
 - Glue (any paper glue will do, but I prefer to use double sided tape, it creates less mess)
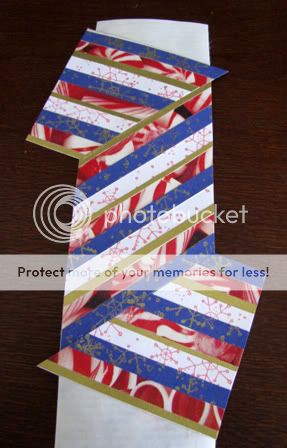
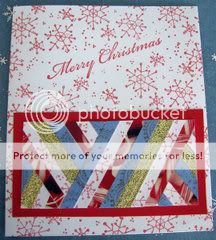
 - Printable digital paper or digital collage sheet – that’s my favorite! This magic stuff turns any card into a masterpiece! Try to find 2 matching patterned papers, just like I did – polka dot and flower pattern – they work well together) I used a usual printer to print the patterns on A4 format thick paper.

That's probably all we will need. :)

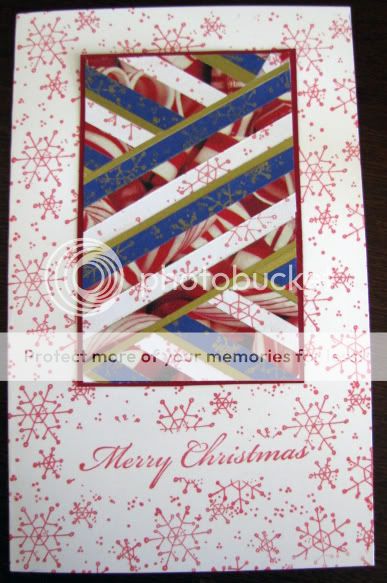
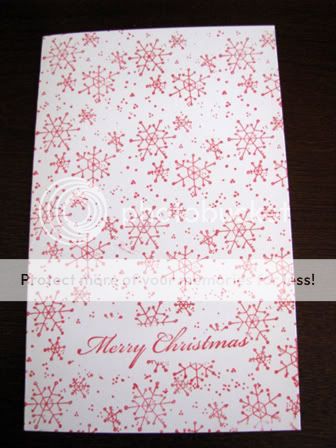
For your cards you can try the ideas on the photos. At fist glance it seems you really need to have some drawing skills, but look again and you’ll notice that the best cards that I made are dead simple!

For example little cute dress on the drying line – easy to make and it’s such a cutie! Or hearts in the shapes of balloons – that’s another great idea for you – be creative and be confident – you’ll get it right)

Tips:
  • Simplicity is the key! Keep it simple, keep it fresh and don’t clutter all you scrap booking elements on one card. Even if you put just one shape out of scrap booking paper (a heart for example) and write a name of the recipient underneath it will look stylish and elegant
  • Have a color scheme. 1-2 colors that work together will look better than a rainbow of all your favorite colors together
  • Add personal touches – even if it’s just a hand written message or doodles around the edge – it will help your card to stand out and will show the recipient your true affection.
  • Ribbons and bows are simple but very effective tool in card making - they are cute and they add 3D to your card. (The easy way to attach the ribbon, when you’re using it horizontally, is to make a little cut at the side of the card, thread the ribbon through the hole and glue both ends of the ribbon inside the card – you’ll get clean ends of the ribbon and no glue on the front of the postcard) 
You can find lot’s of cute scrapbooking materials in my shop (GraphicMarket) so next time you are thinking about card making or just need a background for your website, please stop by.

I highly recommend card making as a hobby. Scrapbook collages made it so simple and enjoyable. Just try to make a card yourself next time you’re invited for a birthday party or mother’s day!

Lot’s of my friends told me that they are waiting every year for my Christmas card to arrive , it was so sweet when I realised that people are keeping my cards, they don’t through them away – it makes my hobby very special.

Be creative and have fun!

With love,
Alisa (GraphicMarket)

Monday, December 12, 2011

Free graphic Snowflakes and Christmas alphabet

There is nothing like a white Christmas! We'd like to see these sparkly white little miracles flying in the air while we are warm and cozy around the Christmas tree!

Here is some more snowflakes for you. You can use them for gift tags or winter scrapbooking. Whatever you do they will always look gorgeous and will never melt!
To add that special touch and make your gift even more personal use these free Christmas alphabet:
 The person you give a gift to will thank you with all his heart!

Thank you, Katrin (karisagraphic) for sharing it with us today.

Have a happy Holidays and let it snow!

Monday, April 18, 2011

Vintage Mother's Day graphic

This vintage card is so great, your Mother will love it! Attach it to your gift and lovely roses and cheerful colors of the card will make her day even more delightful!


This image was kindly offered by Katrin (Karisagraphic)

Monday, April 11, 2011

Vintage Easter rabbit graphic

This is a lovely antique Easter rabbit image for you today, right in time for Easter! You can use it as a gift tag, a post card image or use it in your Easter scrapbook project.

Click on image to enlarge
This image is kindly offered by Katrin (karisagraphic)

Monday, January 3, 2011

Free digital collage sheet Zodiac from GraphicLand

Bring a personalized hand made gift to your loved people!

Today, we'd like to share Zodiac digital collage sheet from Irina (GraphicLand shop). See how cute it may look :)


The collage sheet is 4x6 inches; the circles are 1 inch.
These clip art images are perfect for bottle caps, mixed media, collage work, cards, stickers, bookmarks, scrapbooking, jewelry, glass tiles, magnets, and others. You can print as many as you want on your printer.


You can download the collage sheet there . If the link doesn't work, please leave a comment and we'll fix it. And don't forget to come back and download it. :)

The Zodiac bottle cap images are for personal use, for selling them in printed form. Please keep in mind that you can not sell the collage sheet in digital form.

More digital download designs may be found in GraphicLand shop. :)

Monday, December 6, 2010

Holiday Greeting Card

Tutorial by Albina (GoodWeather)

This step by step tutorial will demonstrate how to make a personalized zig-zag greeting card.

Christmas greeting card tutorial
You will need hard white paper, stamps with inscriptions and ink for them, colored paper, glue and scissors (or trimmer).

Cut a 20 x15 cm rectangle (long square) out of hard paper and fold it by half. You now have a blank 10 x 15 cm card. If you wish, you can change the card’s dimensions according to your preference.

Now create a background pattern and add the greeting phrase on the front of the card with stamps and ink. In this case snowflakes and “Merry Christmas” stamps were used. The paper should be stamped in such a way that one picture does not push into another.

Christmas greeting card tutorial
The card is almost ready. If you do not have much time, this could be your finished project:)

Christmas greeting card tutorial
If your are not in a hurry, there are more things to be done with the card.
Cut strips of paper 5-6 mm wide out of colored paper sheets. I also put stamp pattern on some paper. Moreover, I cut the gold colored paper in even thinner strips:). The strips are 15 cm long.

Christmas greeting card tutorial
Put a layer of glue on a 5 х 15 cm thin white paper sheet and stick strips of colored paper on it following a pattern. If you prefer things to look chaotic and unpredictable, you could stick them with no pattern in mind at all.

Christmas greeting card tutorial
Take another sheet of thin paper 5 cm wide. Keep in mind that all dimensions mentioned are optional. Glue the striped sheet of paper to it under the angle of 45*.

Christmas greeting card tutorial

Turn over the sheet and cut the striped parts that are sticking out on both sides.

Christmas greeting card tutorialGlue the segments that had been cut to create zig-zag effect.

Christmas greeting card tutorial
Cut any sticking out pieces to get a rectangle.

Christmas greeting card tutorial
Glue the zig-zaged rectangle to a background sheet and then to the stamped greeting card.
It is also possible to glue thin ribbons or thread in addition to the stripes of paper.

Christmas greeting card tutorialYour new card is ready!

Christmas greeting card tutorial

Translated by Anastasia (Lightkeeping)
Related Posts Plugin for WordPress, Blogger...