


This lovely hat might be exactly what you need for your fun Halloween Party! Svetlana from NESJewelry will show you how to make this!

You will need
1. a sheet of thick cardboard or .5 inch-thick sheet of Styrofoam
2. an umbrella you do not need
3. thick fabric such (old jeans will do)
4. scissors, thread, needles, pins, sewing machine, exacto knife
5. a cat :)

First, draw 2 concentric circles with diameters of 4 and 8 inches on the cardboard sheet. Cut out a doughnut shape using exacto knife.

Remove fabric off umbrella and cut off two sectors.

Cut the same "2-sector" shape out of your thick fabric (jeans). Fold that thick-fabric shape in two and sew it into a cone - it will be used as the centerpiece of the hat.

We will use the remaining sectors of umbrella fabric for the hat's brim.

We will need to remove all the corners first so the outer edge looks like a circle.

Then cut off extra fabric from the central part so you have strip 10 inches wide in a shape of a curve. Sew together the edges of the strip so it makes a circle (sort of).

Thread the narrower edge of the circle so its width matches the bottom of the cone and sew them together by folding the fabric face to face and then stitching through. Insert the thick-fabric cone into the hat and attach lightly with thread.


Pin the underside of the hat to the cardboard doughnut and turn the fabric over while gathering it and pinning it up to the cardboard.

You will need to pin it so the fabric completely covers the cardboard and meets the seam where the cone was attached to the brim thread the fabric to make sure you have gathered it uniformly and hand-sew it together.

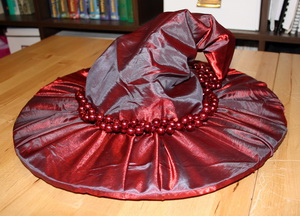
Now your hat looks like this!

Thread the cone along the seam so we can gather it a bit to make the tip of the hat crooked. And that completes our effort - the hat can be worn now!


11 comments:
Interesting idea!! Thank you!
WOW!
Love, love, love this idea!!!!!
Thanks!
great idea) thanks for this post!
хорошая идея, спасибо - дочке покажу
Amazing!! Thank you so much for sharing!
wonderful!!!
What an awesome tutorial! Thank you for sharing!
What a cool idea and tutorial! Have pinned this for next year! Thanks for sharing.
xoxo
Joy
One of my first Halloween costumes had a very old witches hat much like this, but a wire structure inside gave it support.
Excellent idea... coincidentally, there's a falling-apart umbrella available as they've been breaking near the little metal tip at the outside edge.
Your umbrellas are very lovely with their shimmering fabric, and your instructions are nicely delivered with good photos and concise description.
Thank you for reminding me of my first Halloweens.
In addition to the umbrella, I've also got another of the required items for this project - the cat, almost exactly like yours - with tiger markings!
My Good Luck Employee Cat is a faithful, curious, and tireless assistant in every creative project.
awesome tutorial!
Post a Comment