Social Icons

Pages

Showing posts with label nafanyafelt. Show all posts

Monday, May 7, 2012

Create your own underwater paradise!

This easy DIY from Yanina (nafanyafelt) for those of you who like a sea theme or simply enjoy something unique and stylish for your home decor. 

We will need:
1. Polymer clay
2. Brush
3. Pin or needle
4. Wooden board
5. Foil
6. Oven

Step 1
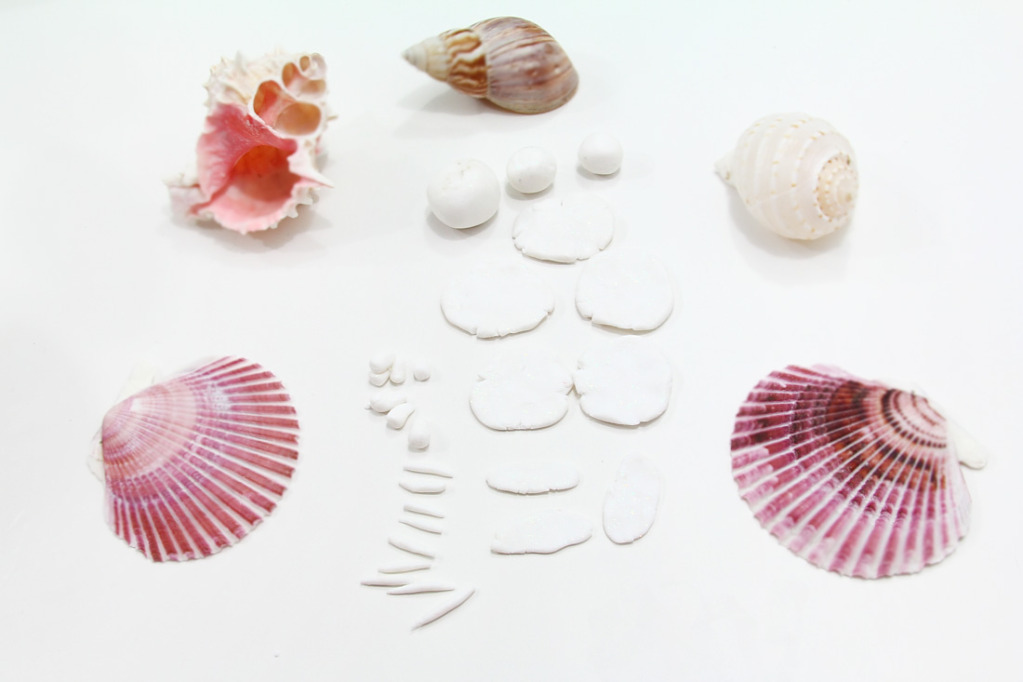
From the polymer clay we will need to make:

3 balls of different sizes
5 thin flatbread like pieces
7 small sausage like pieces with one sharp end and the other end should be wide
9 thin sausage like pieces
3 thin ovals
Step 2
Take the biggest ball and make the oval like impressions by using the round end of the brush handle. Repeat with remained two balls
Step 3
Take a flatbread like piece in one hand and put the handle end of the brush in a middle of it

 Wrap the polymer clay around the end of the brush handle, leaving most of the clay at the very end and spread it in a thin layer around the handle.

Carefully take the new piece off of the handle. Repeat with all flatbread like pieces

Step 4
Take a sausage like piece with different ends and install the needle in the wide end

By making a clock wise rotation you will get a small but seeable hole. Repeat with all pieces
Step 5
The seven small sausage like pieces and three oval ones do not need any changing, they are ready to use.

Now we can assemble our decorations. How to assemble is your choice, make it your stylish piece.


Step 6
Cover the wooden board with a piece of foil. It will make it easier to transfer the decorations into the oven, because you can bake it right on the foil.Carefully transfer your decorations into the oven and bake accordingly to the polymer clay package instructions.

And....it is ready!

Here is some ideas on finished pieces - happy crafting!


Tutorial by Yanina (nafanyafelt)

Sunday, March 18, 2012

Lifestyle: yoga

Hello, our wonderful readers!

My name is Yanina and I own shop nafanyafelt on etsy, but today I will talk about yoga. If you have missed my previous post about yoga, no worries, I will go over some of it again.

As we all know it is very important to be yourself, but it is even more important to let it go.

And yes I know I have said that before, but trust me not all of us can do it, so be ready to hear this phrase a lot :)

My story have begun 4 years ago. I have met a wonderful person once, who was so passionate about yoga that I could not resist and I had to try it.

And my journey begins...

 4pm Sunday. My first practice.

Small room, soft music, dim lights and 104 degree. I didn't know what to expect, I didn't know if I will survive the heat and I didn't know that from this very moment I would find my passion, discover my style of life and learn so much!

To be honest my very first practice was awful from every point. I looked around a lot, I have checked myself in the mirrors even more often (well I am a women after all).

I compared myself to others in this small room and felt so weak and awkward. It was so painful not only for my muscles but also for my ego, even thought I didn't try to compete :)

I was inspired by people around me, they were so calm and moved so gracefully!
And yes I was jealous. I was jealous of what they can do, for me it was impossible even imagine I ever could tied myself in such knot or lift my body on one arm.

I have said out loud so many times I will never get this done, and every single time this little voice in my head would whisper practice takes time. To be honest my teacher said exactly the same thing to me once and now I say it out loud to everyone.

Practice takes time, practice and you will get it done. This phrase can be very well used in a regular life too, not just in yoga.

And I listened, and I learned and I grew.


 And I did. And I do...

Along my physical progress I have learned the importance of what I eat.
And today I would like to share with you the recipe of my favorite desert.


Ingredients:
angel's food cake
Greek yogurt (any plain yogurt will work too)
ricotta cheese
strawberry
whipped cream for garnish
mint leaves for garnish
sugar

1.Set aside some strawberries for garnish

Slice the rest of the strawberries into small pieces.

2. In large bowl, with mixer at medium speed, beat yogurt and ricotta cheese and 2 tablespoons sugar until soft
peaks form.

Reserve some of this cream for garnish, if you don't have whipped cream on hand.
*If the cream doesn't hold the pikes you can add some gelatin mixed with water according to directions on the packaging.

4. Fold strawberries into yogurt-riccota cheese cream remaining in bowl.

5. Cut cake into 3 equal pieces

Place 1st cake strip on platter; spread with half of mixture with strawberry. Top with 1 more cake strip then with remaining mixture. Top with remaining cake.

6. Spread reserved cream on top of cake or garnish with whipped cream.

Cut each reserved strawberry in half; use to garnish platter and top of cake. Finish with mint leaves.

Refrigerate if not serving right away. Refrigerate for 1 hour if gelatin has been used.


Enjoy and remember:

“Watch your thoughts, for they become words.
Watch your words, for they become actions.
Watch your actions, for they become habits.
Watch your habits, for they become character.
Watch your character, for it becomes your destiny"

Sunday, February 26, 2012

Yoga for everyone

Hello,

My name is Yanina and I am a felting artist. I own the nafanyafelt shop on Etsy but today I will not talk about felt. I`d like to share my knowledge of yoga with you.

Yes. Yoga.


Let me tell you what I tell newcomers in the studio I practice in (and make no mistake I am not a teacher, I am just a student, who talks a lot, lol )

Yoga is like some kind of weird food. You either fell in love with it from the first bite or you need time to understand the taste, but when you do, you will love it.

Yoga has nothing to do with getting in shape...oh no, of course you are going to get fit, flexible, strong and will have this amazing yoga butt. You will learn how to do impressive asanas and bend in every direction and the best part for us, girls, it is the feeling of lightness in your body.

Sounds good, right?

Oh well, yoga is not about that.

Mostly yoga is about being present. Live now, this second.

It is a life style of change in your life, not because you have to, but because you want to.


And the first change (and the easiest one) is the way you eat.

The practice will dictate what to eat, and believe me the practice is the worst dictator ever.

And you will listen, oh yes, you will listen.

All the food which gives us, girls, a muffin top will be forgotten.

And you will want it. Easy, right?

We all love lasagna. This is a very tasty Italian dish but at the same time a very heavy and oily meal. Today I would like to share yoga style lasagna recipe with you.

Ingredients:
•1/2 pound lasagna noodles
•2 10-ounce packages frozen chopped spinach, thawed
•1 pound soft tofu
•1 pound firm tofu
•3 tbsp minced fresh basil
•2 tsp salt
•1 32-ounce jar of tomato sauce

Preparation:

Soak the lasagna noodles in hot water for 10 minutes. Drain carefully and set aside on a towel.

Pre-heat oven to 350 degrees.

Squeeze the spinach as dry as possible and set aside.

Place the tofu and salt in a food processor or blender and blend until smooth.

Cover the bottom of a 9x13 inch baking pan with a thin layer of tomato sauce, then a layer of noodles. Follow that with a layer of half the tofu, half the spinach and half the basil. Continue in the same order, using half of the remaining tomato sauce and noodles and the rest of the tofu mixture, spinach and basil. End with the remaining noodles covered by the remaining tomato sauce.

Enjoy!

By Yanina (nafanyafelt)
Related Posts Plugin for WordPress, Blogger...