Today, Olena from
SunshineFelt shop on Etsy is sharing how to make “Pysanka” (Ukrainian Easter egg).
This word comes from the Ukrainian verb “pysaty” that means "to write", as the designs are not painted on, but written with beeswax.
What we need:
1. Eggs. Try to select clean eggs with proper shape. If you wipe eggs with vinegar the paint will be put on the shell more smoothly and efficiently.
2. Dye (paint) for eggs (yellow, red and black). To dissolve paint we should take a jar (0.5 l) for each color, put a glass of hot water (not boiling!) and then add the dye in. Then we should wait for when it cools down and add 1 tablespoon of vinegar into each jar.
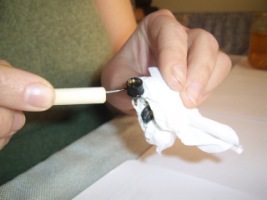
3. Kistka - special instrument with which you apply the beeswax to the egg.
4. Beeswax.
5. Paraffin candles.
6. Spoon.
7. Paper napkins.
Get to work we should with good thoughts and good mood. Before beginning think about whom we are doing these eggs, and what we want to wish this person. That’s why we should know something about symbols. Now it is not a problem because there is enough information. For example “Ruzha” (star) is a good symbol for women. This symbol is given to wish love, happiness, prosperity, birth of kids. It can be also presented for sick people. This is a solar symbol and it is universal. So we’ll write this symbol.
If you are writing an Easter egg for the first time, it will be better at first to make a picture on an egg with a pencil, and then repeat it again with wax. Take the egg in your left hand. It will be more convenient for you to cover an egg with your palm. While writing a left hand is dynamic and right is static. It means that a hand with egg is moving (direction - away from you), and your hand with a pencil or with “kistka” (special instrument) should be in static position. Your right hand should be well fixed on the egg, and then the line will be clear and straight. We should start to write from one end of an egg, then lead across the circle and connect the beginning and the end of the circle.


In the same way we make one more circle perpendicular to the first one. Further we should make one more perpendicular line - horizontal “equator” of our egg. Then we take one intersection in the middle of an egg, make a diagonal line that passes through the middle of the next vertical line and goes back to the next intersection in the middle and so on. So we are forming a diagonal line through the whole egg. The same thing we do at the intersection of lines on the opposite side. That’s how we can obtain a matrix for writing many different Easter eggs.
The center of our symbol of “Ruzha” (star) is located at the intersection of vertical, horizontal and diagonal lines. After we have written on one side turn an egg at 180 degrees and write the second star. In places where two lines are crossed we can write a four-pointed star
Next we repeat all our actions from the beginning with “kistka” and wax. After that we should light candles to heat in the flame (funnel end should not be put into the fire not to become cluttered with carbon) and then fulfill it with wax. Also we can clean “kistka” from the outside with paper napkin (not to put a thick wax drop on egg). At first we can try to write on a piece of paper an if everything is going well, and then proceed to our Easter egg.
Periodically heat the “kistka”, so that the wax is not cooled.
After applying the wax double check your egg to make sure you didn't miss any lines. Then dip the egg in yellow paint for 5-8 minutes. The whole egg will be painted, and the part covered with wax will remain white.
Remove egg with the spoon, and sponge it with paper napkin. Then take “kistka” once more and heat it again. We are writing parts
that should be yellow (in our case - lines in the star and beyond,
including 2 rays of four-pointed stars).
After have written on one side, then turn 180 degrees and write as well. Then drop the egg in red paint. Then write what will be red, and drop in black paint.
Remove from paint, let dry and proceed to the final step - removing wax.
You can do it near the flame of a candle (do not hold the egg over the flame, because carbon will collect on the shell, and darken the design) or near the switched on burner of a gas stove. Keep painted Easter egg near the flame about 2-3 seconds, make short pendular movements and then quickly remove wax with paper napkin.
P.S. One more tip: sometimes happens that “kistka” does not want to write, it means that funnel end is full of carbon. You can use thin wire to clean it or put hot “kistka” into wax.
Story by Olena (SunshineFelt)